This is part two (of three) in a series about ReasonML and typed functional programming. You can read part one and part three here.
ReasonReact
ReasonReact could best be described as a Reason library for React that deeply integrates with features of Reason language. Things which are programming patterns of use in JS become language features while in Reason. This lends the library an integrated feel -- like the two were designed together.
As a relative newcomer to React, I found the types in ReasonReact to be an effective affordance for using the library. Whenever I was confused about what something did or what was best practice, I could lean on the type system to find out. Granted, and this may be a strange perspective, but I'm coming to Reason from the OCaml and static FP side of things. ReactJS users may find the type system to be an impediment initially, rather than a learning aid. Overall, I've found Reason's type system strikes a good balance between getting out of your way and guiding proper usage.
Let's look at a small example project. Since this is ultimately a JS framework, we're required by law1 to show a Todo List application.
TodoList.re: types and component initialization
module Style = Style.TodoList;

type action =
		| Create
		| Delete(Todo.t)
		| Noop
		| UpdatePendingString(string)
		| Toggle(Todo.t);

type t = {
		todos: list(Todo.t),
		pendingTodo: string,
};

let component = ReasonReact.reducerComponent("TodoList");
Styles are imported from an external module (not shown). As we'll see, these are type checked; meaning no unimplemented styles or misnamed classes!
action is a sum type (sometimes known as an enum or union type) with a case for each possible action that application can take. If you've worked with React with Redux, this should start to look familiar.
t is a convention in OCaml/Reason meaning the type that this module represents, in this case it means TodoList.
TodoList.re: Standalone reducer2 function
let reducer = (action, state) =>
		switch (action) {
		| Noop => None
		| UpdatePendingString(text) => Some({...state, pendingTodo: text})
		| Delete(todo) =>
				let todos = Belt.List.keep(state.todos, item => item !== todo);
				Some({...state, todos});
		| Create =>
				switch (String.trim(state.pendingTodo)) {
				| "" => None
				| txt =>
						let todos = state.todos @ [{text: txt, finished: false}];
						Some({pendingTodo: "", todos});
				}
		| Toggle(todo) =>
				let toggleTodo: Todo.t => Todo.t = (
				item => item == todo ? {...item, finished: !item.finished} : item
				);
				let todos = List.map(toggleTodo, state.todos);
				Some({...state, todos});
		};
This deviates from standard ReasonReact style a bit. I extracted reducer from the rest of the component, we'll see that component in a minute. I did this to expose the reducer function for easier testing.
The reducer function maps the current state of the application and an incoming action into a new state. If there is work to do, then we have Some(...) whereas if there's nothing to do (state didn't change), then we return None3. This lets us test the component by setting up an example state, passing it to reducer and then asserting on the output.
Next, we start in on the actual Todo List component. A ReasonReact component "inherits" from the record returned from calling ReasonReact.reducerComponent(...). To do this, we object spread our own custom fields into the prototype record. This feels a lot like overriding methods, but it is merely selectively replacing items in a record full of functions. We then implement our own functions that are required in order to be a component.
TodoList.re: Component init
let make = _children => {
		...component,
		initialState: () => {todos: [], pendingTodo: ""},
		reducer: (action, state) =>
				Belt.Option.mapWithDefault(
						reducer(action, state), /* an option value */
						ReasonReact.NoUpdate, /* if the option is None */
						newState => ReasonReact.Update(newState) /* function if option is Some */
				),
}
Okay, now we're at the core of the React component. Every module which defines a ReasonReact component will have a make function whose job it is to "make" the component. When we use our component in JSX as <MyComponent … /> the framework will initialize it by calling the make function. N.b. part of the function signature of a component is always children, and this is where ReasonReact differs a bit from ReactJS. children must always be an parameter to the make function whether or not you use it. We are not using it here and so we prefix the param with an underscore to tell the compiler, "I'm not using this argument, don't give me a warning."
We set up the initial state by defining initialState, it has the general signature of unit => ‘state, whatever our state type happens to be.
Here we use an adapter function, called Belt.Option.mapWithDefault to make our external reducer fit into the slot required here. mapWithDefault takes three arguments:
-
an
optionvalue, -
a
default(for when the option is None), - and a callback.
If the result of calling our external reducer function is None, we tell ReasonReact that there's nothing to do, NoUpdate.
Otherwise, we handle the newState by passing it to the Update function – telling ReasonReact that it needs to re-render our component.
TodoList.re: Render function
The render function starts off with several helpers to aid in generating the HTML that'll be returned. Let's look at the code and then circle back to what it's doing.
Now here's the full render function for the todo list:
render: self => {
	let todoItems = items =>
			List.map(
					(todo: Todo.t) =>
							<Todo
									key=("key-" ++ string_of_int(Random.bits()))
									text=todo.text
									finished=todo.finished
									onDelete=(_mouseEvent => self.send(Delete(todo)))
									onClick=(_mouseEvent => self.send(Toggle(todo)))
							/>,
					items,
			);

	let onKeyDown = event =>
			if (ReactEventRe.Keyboard.keyCode(event) === 13) {
					ReactEventRe.Keyboard.preventDefault(event);
					self.send(Create);
			} else {
					self.send(Noop);
			};

	let onChange = event => {
			let str: string = ReactDOMRe.domElementToObj(
					ReactEventRe.Form.target(event),
			)##value;
			self.send(UpdatePendingString(str));
	};
	<div className=Style.body>
			<h1 className=Style.title>
					(ReasonReact.string("TODO LIST (v4.1, Shareware)"))
			</h1>
			(ReactDOMRe.createElement("label", [|ReasonReact.string("Todo")|]))
			<input
					className=Style.input
					name="input"
					placeholder="Add new TODO"
					value=self.state.pendingTodo
					onKeyDown
					onChange
			/>
			<h2 className=Style.listHeading> (ReasonReact.string("Items")) </h2>
			<ul className=Style.list>
					(
							switch (self.state.todos) {
							| [] => <i> ("Nothing to do" |> ReasonReact.string) </i>
							| todos =>
									todoItems(todos) |> Belt.List.toArray |> ReasonReact.array
							}
					)
			</ul>
			<hr />
			<small className=Style.badgerText>
					(ReasonReact.string("Upgrade to TODO LIST PRO today!!!"))
			</small>
	</div>;}};
This is the biggest chunk of code yet! There's a lot to digest, but let's nibble at the edges first.
todoItems
The first helper function, to here is to render the subcomponents; the individual Todos. For each todo that's in the todos field of our state, we create a Todo component. To handle click events and deleting the todo, we also pass in some anonymous functions that send events of type action into the TodoList component. Recall that Delete and Toggle are variant constructors for the action type.
onKeyDown
The onKeyDown handler is called when the user presses enter in the new Todo text field. Notice that there's no argument to the Create variant constructor. That's because the "current" text of the pending todo is always kept up to date by the onChange handler. After each keypress, the contents of the text box is set as the pendingTodo string.
onChange
Speaking of onChange, it's probably the weirdest looking function in here. The single argument to onChange is event. This is a standard DOM event. What's not so standard is that we're living in a statically typed world now and we have to mind the types. The value event has the type ReactEventRe.Form.t. We can then use a function named ReactEventRe.Form.target to get at the Dom.element target of the event. Next we convert that target into a Js.t (raw JavaScript object). In Reason/BuckleScript we use ## to get at a property on an object4.
Now that we have all our event handlers, we need some HTML to hang them off of. Reason provides nifty JSX syntax so we can write HTML-ish tags with minimal fuss. If you're an under-the-hood type, Reason implements this syntax extension via a general mechanism known as ppx (macros). The tl;dr being, it's relatively easy for developers to add custom syntax to Reason.
In the JSX code inside the render function there are a few points to mention:
-
We need to wrap literal strings in a function call:
ReasonReact.string(...). -
When key and value arguments to JSX component fields are the same (e.g.
onKeyDown) we don't need to pass arguments in this form:onKeyDown=onKeyDown -
We can explicitly create elements using
ReactDomRe.createElement(...), and this is in fact what JSX syntax is desugared into.
Todo.re: Complete module
type t = { text: string; finished: bool };
let component = ReasonReact.statelessComponent("Todo");
let make = (~text, ~finished, ~onDelete, ~onClick, _children) => {
		...component,
		render: _self => {
				let key = ("id-" ++ string_of_int(Random.bits()));
				<li className=Style.item>
						<input
								id=key
								className=Style.checkbox
								type_="checkbox"
								onChange=onClick
								checked=finished
						/>
						<label htmlFor=key className=(finished ? Style.finished : Style.unfinished)>
								(ReasonReact.string(finished ? {j|✔︎|j} : {j|◇|j}))
								(ReasonReact.string(text))
						</label>
						<button className=Style.delete onClick=(evt => onDelete(evt))>
								(ReasonReact.string({j| ✘ |j}))
						</button>
				</li>
		}
};
Note the definition of component. As we saw with reducerComponent, a statelessComponent is called out in the type of the component. The difference from a reducer component is that a stateless component just consists of a render function. You are not allowed to implement a reducer function in a stateless component (or else the types won't match up).
And that's the full application. Let's take a look at what we have:
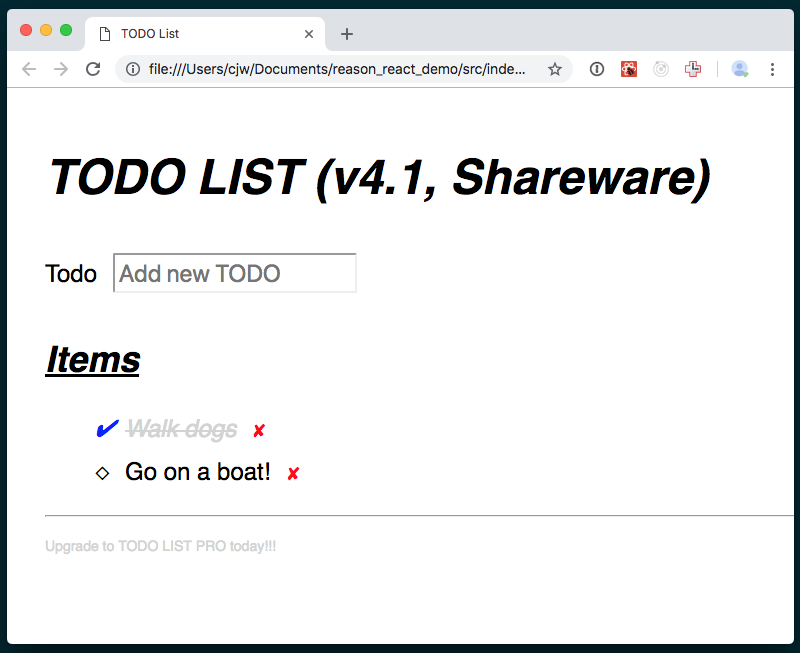
There would be a lot more to do if we wanted to turn this into a real application. We should probably be able to persist Todos locally or save them back to a server. But this is a start.
Summary
In this article we went through a quick ReasonReact app. We gained a feel for how Reason-inflected-React works. ReasonReact uses Reason's language features to support the programming idioms and techniques that are already widely applied.
React component props become Reason's labeled function arguments. Reducers are brought into ReasonReact directly and mesh well with variant types. These are just a few examples.
In the next post I'm going to step onto the soapbox a bit. I will attempt to make the case that Reason, or a language like it, totally rules at business apps.
I probably don't need to tell you that the React ecosystem is a lively place these days. ReasonReact makes working with React even better than it is in JavaScript; it's a laboratory for future ReactJS features. I hope you'll give it a try.
-
Not really, this is another joke. ↩
-
Note that there is a different function for
reducerComponentas opposed tostatelessComponent. These two different components have distinct types. ↩ -
Some/Noneare the two variant constructors for a type known asoption. Option is defined like this:type option(‘a) = Some(‘a) | None;There are two mutually exclusive options for this datatype one which contains data and the other which does not. ↩ -
The ReasonReact docs have another way to accomplish this,
ReactEvent.Form.target(event)##value; That probably the better way to go. When I wrote this article, the method in the code above was the way that I puzzled it out. ↩