Using CDN to prevent performance issues of content management systems
Craft CMS is a content management system that allows a team to organise and edit a website using a simple, non-technical, and intuitive interface. Although Wordpress remains the most popular platform, the flexibility that Craft offers makes it a strong candidate for any new project. In Craft CMS the sky's the limit—there are no templates that you have to stick to, the development team should be able to bring to life even the most creative ideas of the content team. But it’s not all roses.
The problem with Craft CMS (and content management tools in general) is that websites that use it tend to be slower and vulnerable in case of traffic peaks.
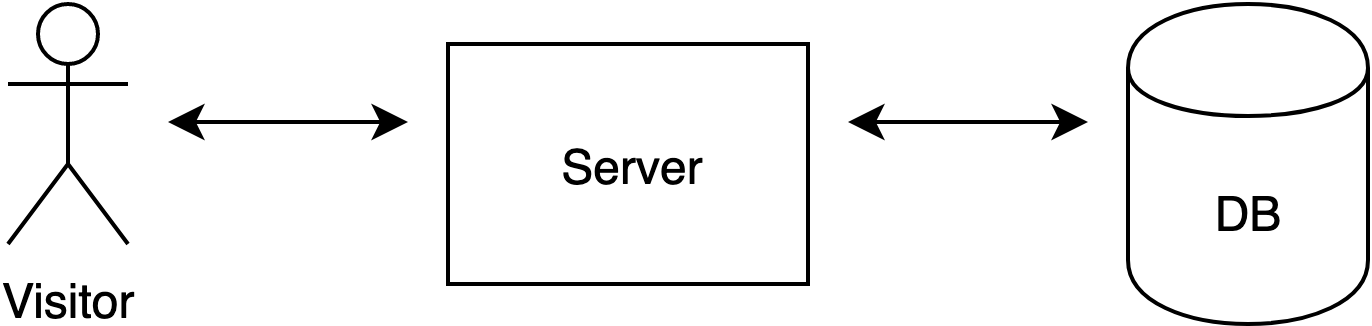
When a person visits a website generated with Craft CMS, the server needs to communicate with a database in order to generate the HTML document.
This is how the Craft CMS template looks like when written by the developer:
 <div>
 {% block.title %}
 </div>
And this is the HTML generated:
 <div>
 What a great title!
 </div>
The browsers don’t understand Twig blocks ({% ... %}), and therefore Craft CMS needs to fill them with the content pulled from the database, which was previously created via the Craft CMS control panel.
Each time you visit a page containing the div above, the same operation of putting together the HTML file happens. In a simplified version, it looks like this:
In case of a traffic peak, when the number of operations that need to be performed every minute grows rapidly, the risk of the server getting overloaded—and, as a result, the website going down—increases.
One of our clients was facing this risk with relation to their Craft CMS application. On a day-to-day basis it was working ok-ish—although its performance was rather average, it wasn’t affecting the UX. However, the website was visibly slowing down during traffic peaks, and it crashed due to this reason in the past. 8th Light was asked to improve the website’s performance and reliability.
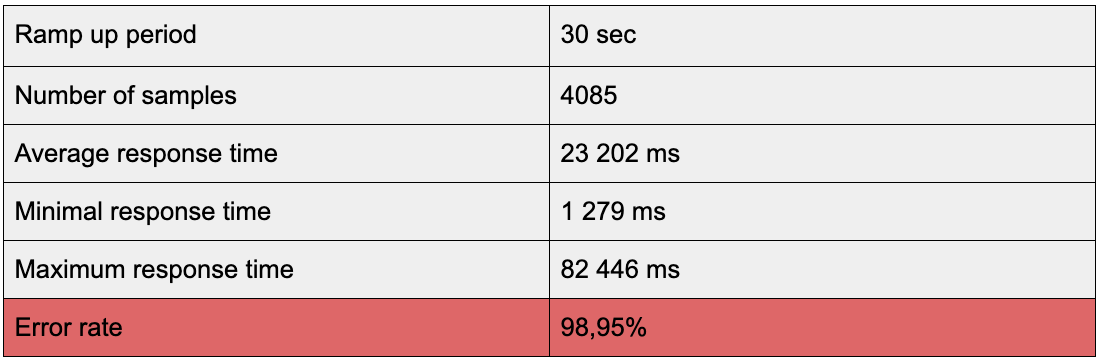
In order to assess the situation, we started by running a JMeter performance test on the website’s landing page. The results were poor.
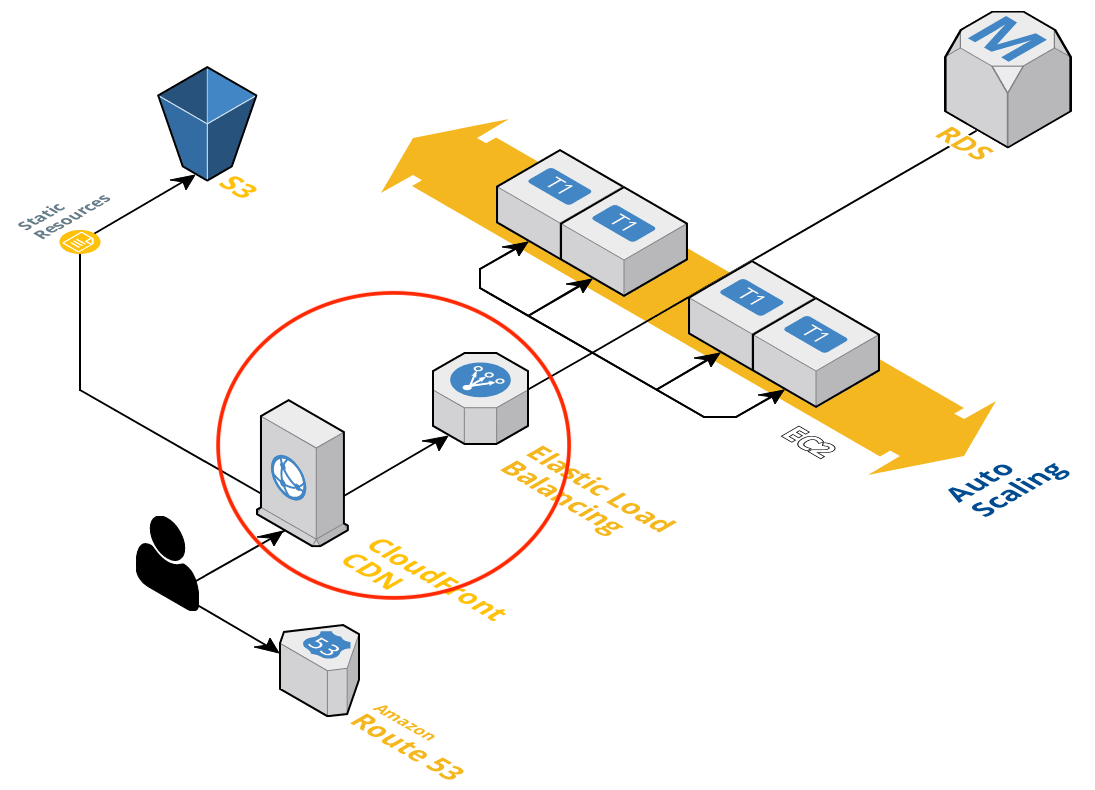
The website was static—it was showing the same content to each visitor and was rarely changing (on average it was once every day). Due to these characteristics, we decided to decrease the load on the server by using a content delivery network (CDN)—and more specifically, AWS CloudFront—to cache content.

When the visitor opens a website served with CloudFront, the visitor gets routed to the edge location that provides the lowest latency (time delay).
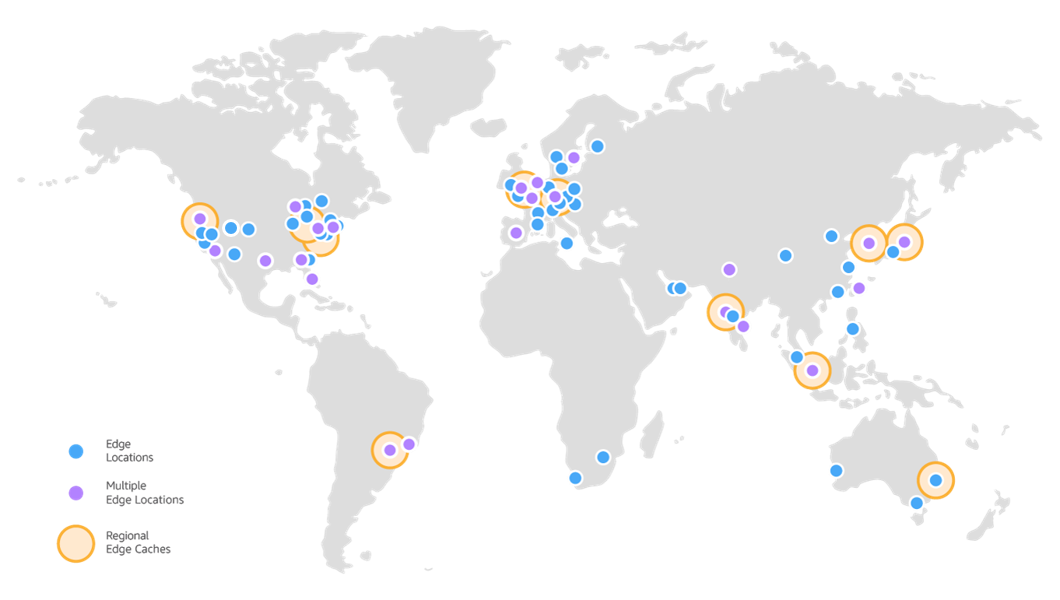
In each edge location, DNS routes the request to the CloudFront POP (edge location) that can best serve the request—typically the nearest CloudFront POP in terms of latency. In the POP, CloudFront checks its cache for the requested files. If the files are in the cache (Hit), the content will be loaded directly from CloudFront, without having to reach the database. If the content is not available in CloudFront (Miss), the whole cycle will take place as if CloudFront didn’t exist.
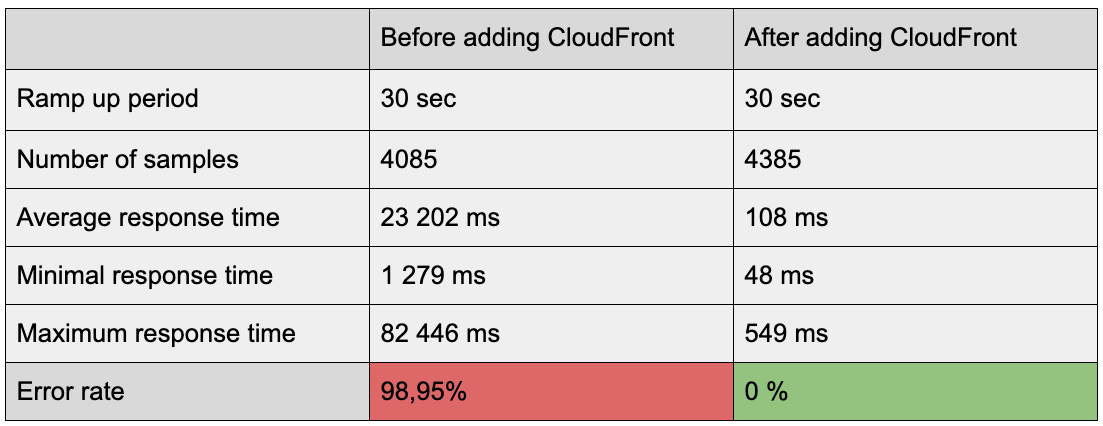
Implementing CloudFront decreased the loading time of our client’s website on average by more than half. It also hugely improved the website’s resilience in case of traffic peaks. Below I present the results of JMeter load tests that I’ve carried out before and after implementing CloudFront.
The results we obtained thanks to CloudFront were impressive, but getting there required many configuration changes that weren’t well documented.
There are already some useful articles about putting CloudFront in front of WordPress architecture, e.g. here and here, but there aren’t any about Craft CMS. There are also hundreds of articles and tutorials regarding setting up a basic CF distribution. The AWS example is quite handy as well. However, it’s very hard to find resources that go deeper than the very surface.
In this blog, I aim to fill the knowledge gaps and focus on more specific issues I encountered that weren't covered in those resources.
Connecting CloudFront with the Load Balancer — certificate issues
When you’re setting up CloudFront, you need to pick an origin for it—the element of your architecture that CloudFront will be communicating with. In the case of our client’s architecture, it was an AWS Elastic Load Balancer (ELB).
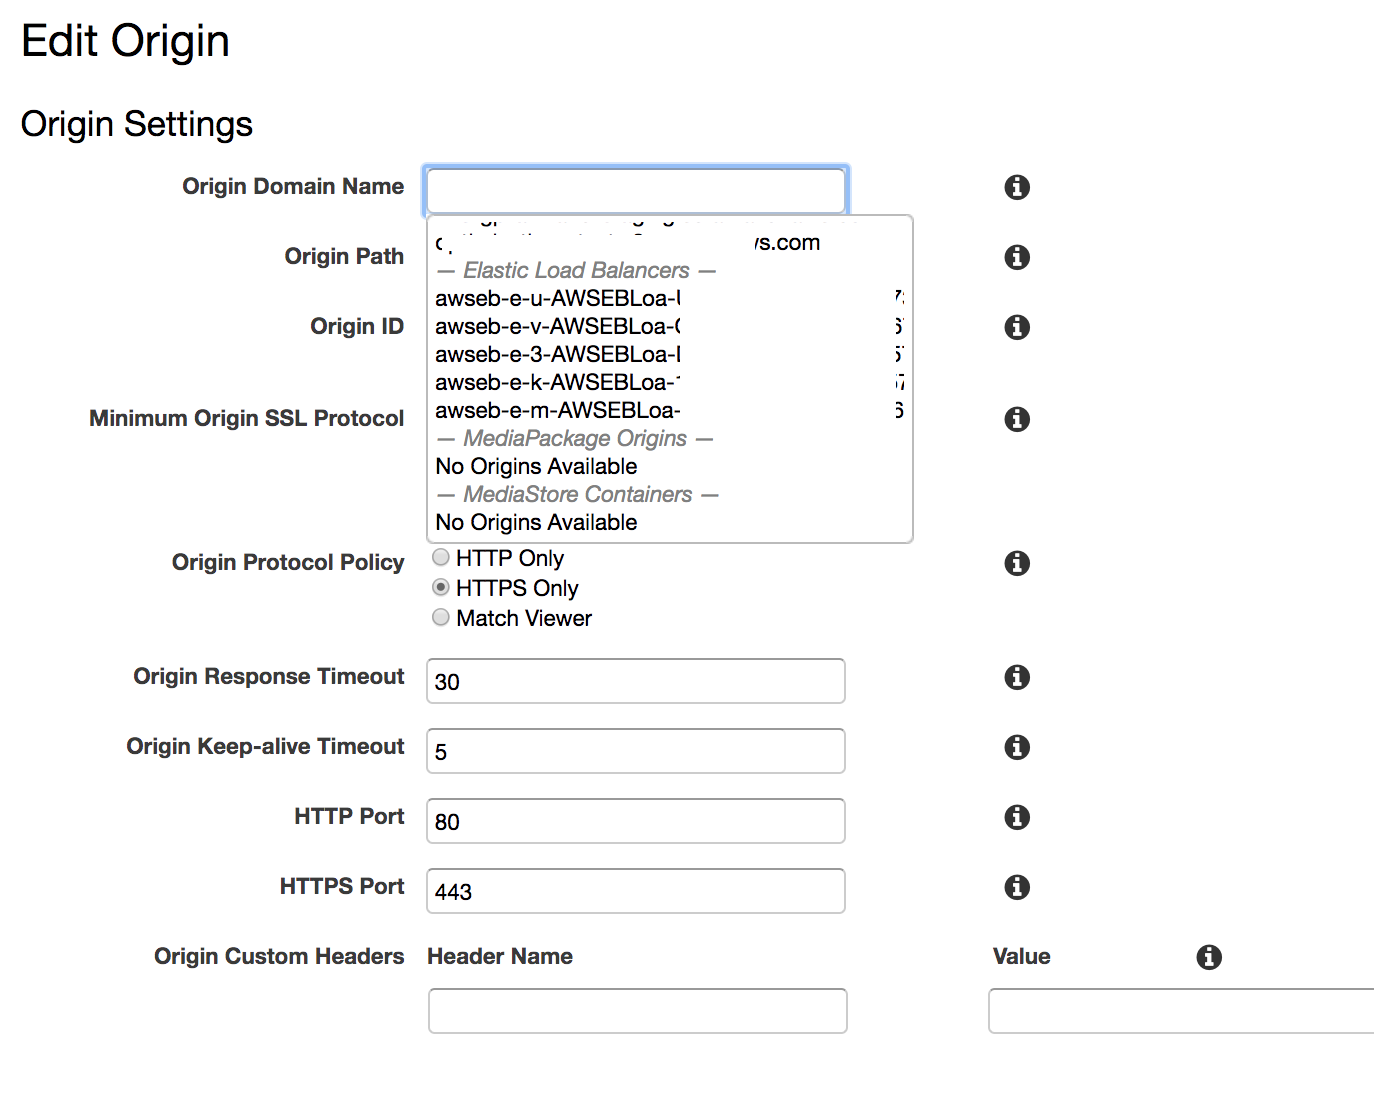
In order to set up the origin, I went to CloudFront AWS console, selected Create Distribution, and picked Web. In the Create Origin tab, I’ve selected the ELB from the list that is displayed when you click on the Origin Domain Name input field.
In order to test the origin, I went to my CloudFront domain (you can find the name of your domain in the main CloudFront control panel, in the Domain Name column). Unfortunately, I was given a 502 response.
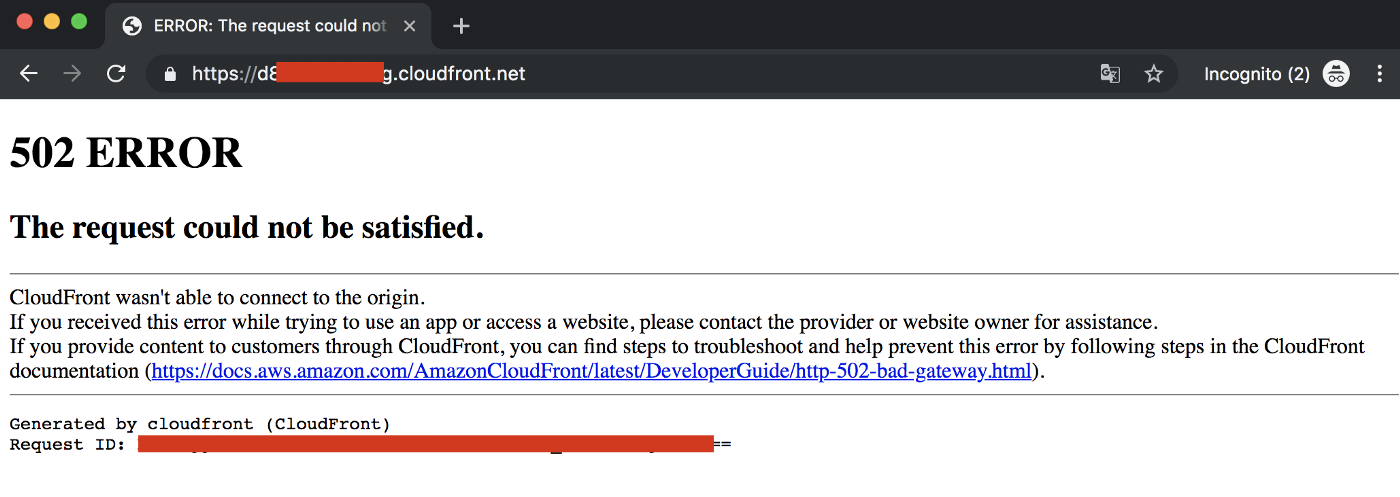
After reading the AWS troubleshooting documentation, I learned that the issue was caused by an SSL/TLS negotiation failure between CF and ELB (both CloudFront and ELB were set up to encrypt communication with their clients using SSL certificate).
In practice it meant that the Load Balancer was using a different certificate than the one used by CloudFront. In order to give ELB the same certificate as the one that CF has, I created a CNAME for the Load Balancer on the same domain for which I was planning to set up the CloudFront.

In order to make use of the new CNAME, you need to write it in the Origin Domain Name input field. I know, the UX doesn’t suggest that you can write anything in there, but you actually can! Putting ELB on a domain for which I’m setting up CloudFront solved the issue!
At this point I had CloudFront talking to Load Balancer. Instead of seeing the error page as before, I was given the actual content of the landing page. Hooray! Progress! The GET requests were working fine, but I’ve spotted issues with logging into the control panel and sending forms.
Exclude the control panel from caching
At this point, the only behaviour that I had for my origin was Default (\*), and it had unlimited caching enabled. As a result, the control panel was cached as well. First of all, you shouldn’t cache Craft CMS control panel because you want the updates in there propagated immediately. Secondly, you need to disable caching if you intend to log in anyway. Below I will talk about the way I’ve set caching limitation in order to enable login.
The client’s website uses the myDomain.com/admin URL to access the control panel. When you type in the correct credentials on myDomain.com/admin, the URL that you see in the browser changes from myDomain.com/admin to myDomain.com/admin/dashboard. Because both paths include /admin, I thought that in order to disable caching for the control panel, I needed to exclude the /admin/* path from caching.

The whole setup was right, but wasn’t enough. It turned out that the /admin/* path worked fine for situations when I was already logged in, but wasn’t enough to let me log in—for this I needed additional behavior.
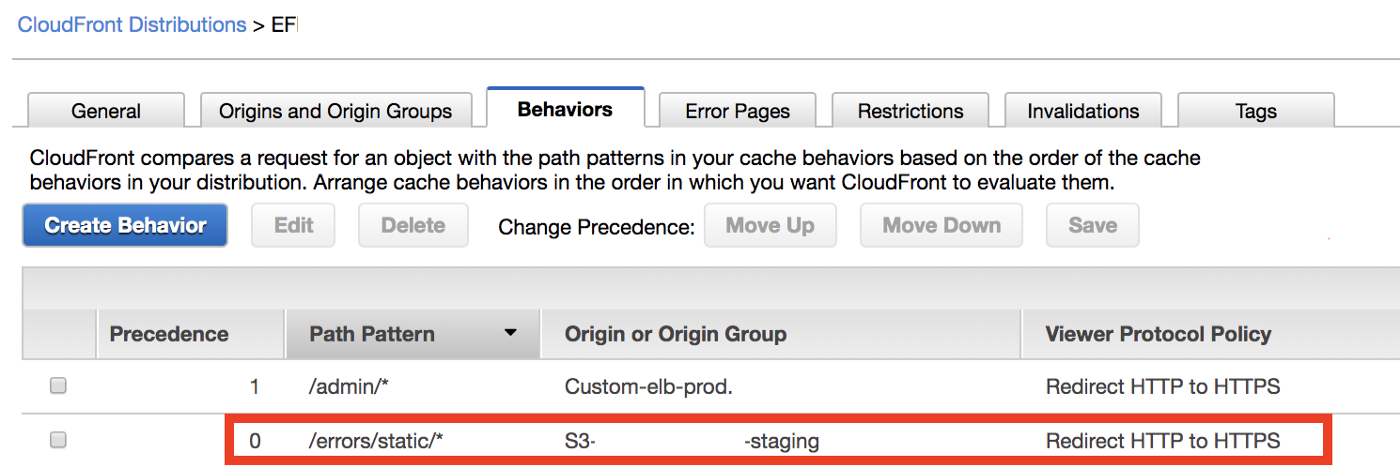
When focusing on the /admin/* path, I’ve made a mistake by thinking that the Path Pattern in the Cache Behavior Settings (see the screenshot above) is the same path that you see in the browser. However, one shouldn’t focus on the URL one sees in the browser, but check the browser’s dev tools network tab to see the actual URL to which the request is made. In case of logging in, the request’s path wasn’t really /admin/..., but /index.php?p=admin/actions/users/login.
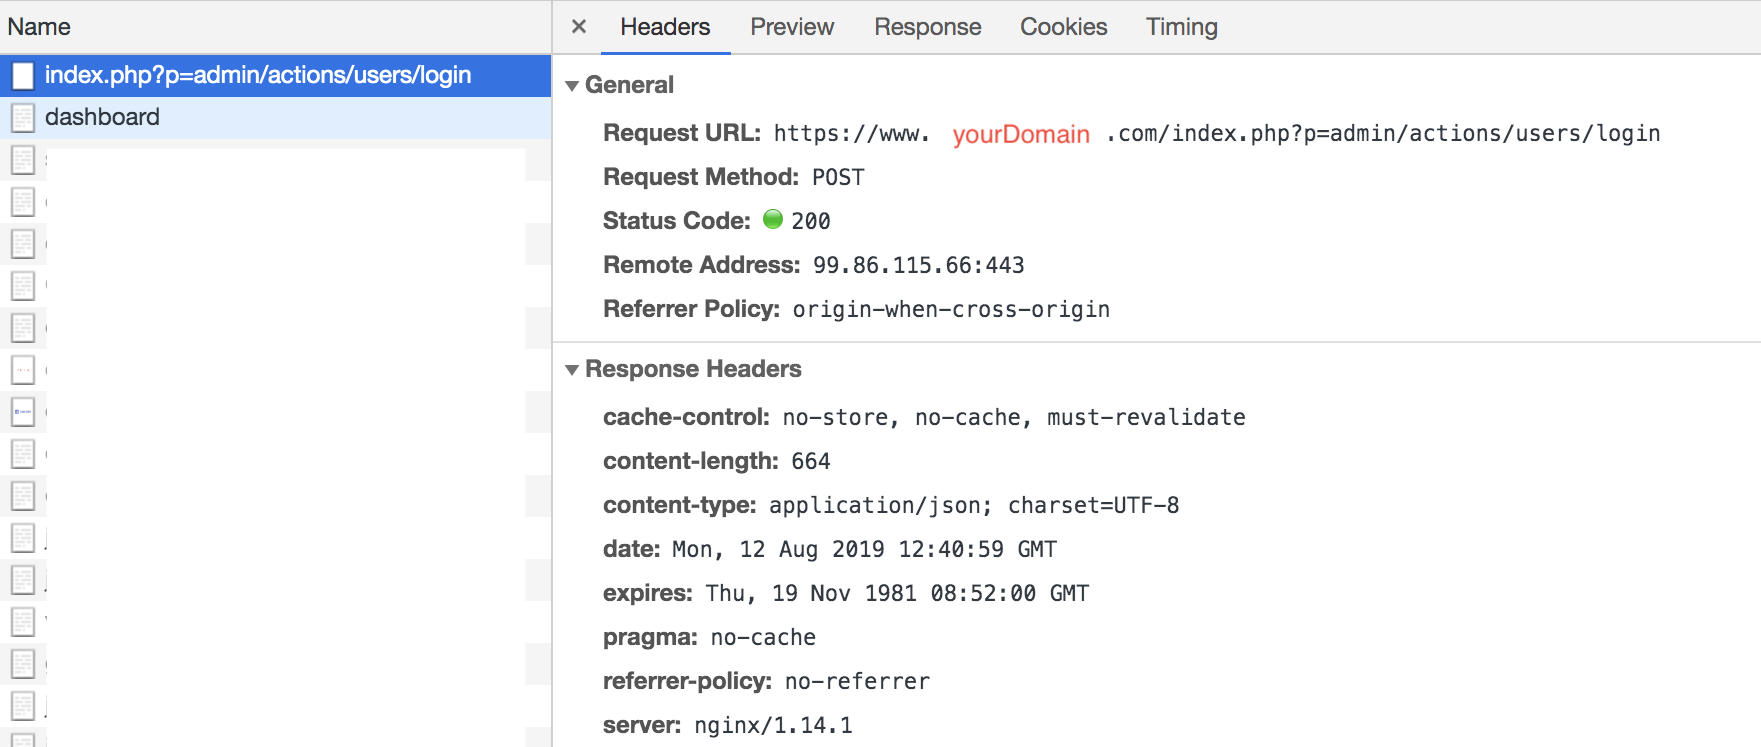
Therefore, in order to enable logging in, I needed to add one more behavior, analogous to /admin/* this time for /index.php, and voila! Login worked.
CloudFront does not follow redirects
Another issue related to the fact that I was caching too much was getting stuck on redirects. As the AWS documentation puts it in very general and vague terms, CloudFront does not follow redirects. It means that if you have a redirect on your page (e.g. a form redirects to a certain page on submission), CloudFront won’t follow the redirect when caching is enabled. In plain words, you will get stuck on the page that was meant to redirect you.
In order to fix the issue, you need to disable caching for the path to which a redirect requests points. In case of my forms (I’m using the Contact Form plugin), they were all pointing to the root:
if (inputIsValid('#myForm')) {
		$.post({
				url: "/"
				...
		});
}
I couldn’t disable caching for root, as this is the page that gets the most traffic. Instead I’ve added a global set called notCached to my Craft application, which is a path to which I point all my forms (I’ve created a global set in order to avoid a magic string in my code). For this path I’ve created another behavior in my CF (similar to the admin and index.php ones) and disabled caching for it.
if (inputIsValid('#myForm')) {
		$.post({
				url: "{{ craft.globals.getSetByHandle('notCached').label }}"
				...
		});
}
CloudFront redirects to ELB URL on POST requests
Another issue I faced was the fact that CF was making an unexpected redirection to ELB URL on POST requests (the same problem was described here). When I was doing an action that was triggering POST, I was getting redirected to the ELB domain instead of staying on my “main” domain.
This bizarre behaviour was caused by the fact that by default, CloudFront sets the value of the Host header to the domain name of the origin (see the AWS documentation for Host, Origin, and Referer to learn more), which, as a result, changes the domain.
In order to prevent it, I needed to whitelist the Host, Origin, and Referer headers for the Default behavior.
Adding CloudFront error pages
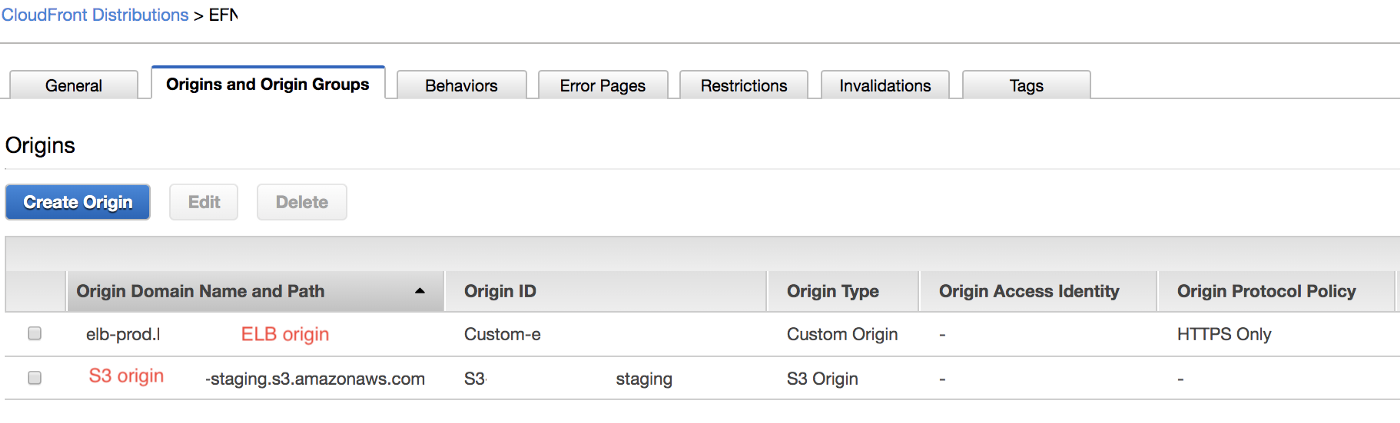
CloudFront allows you to set up error pages in a quite effortless way. All you need to do is to add an HTML error page to S3, add that S3 as an additional origin, select which errors you want to trigger the error page for, and provide a path to an HTML file. This is easier said than done because of unclear instructions regarding how to write a Path to the error page. So let me show you how I did it.
Add the new S3 origin:
Once you have your origin, you need to add the behaviour. In the path pattern, add a path to the directory in which the HTML file resides. In my case, on the root of S3, I have an /errorsdirectory, inside of which I have a /static directory, inside of which I have an index.html file.
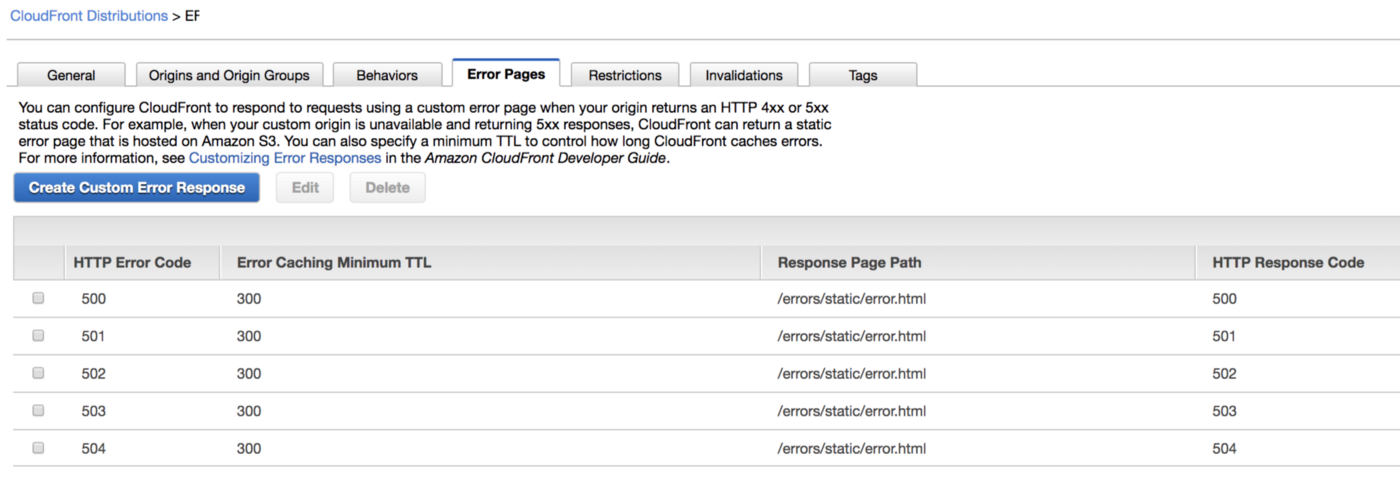
Last but not least, you need to go to the Error Pages tab and link the error page.
One could think (I did at least) that if the Path Pattern is /errors/static/*, then the path to the HTML file should be index.html. Well, that’s not true. The path should be /errors/static/index.html. The path in the Behavior Path Pattern needs to overlap with the path in Error Pages.
Connect the DNS to the CF — don't use a root domain as a CNAME
The final act of my CloudFront adventure was connecting the DNS to my CF distribution. I had two CF distributions (set up in essentially the same way, just the ELB origins were different): one for staging (staging.myDomain.com) and one for production (myDomain.com). I’ve started with changing the DNS endpoint for staging. I went to Route53 and made the staging.myDomain.com domain point to the CloudFront domain instead of pointing to Elastic Beanstalk URL as it did before. It worked. I’m almost there, I thought. Life is beautiful! I went on and made the same change for production, aaaaand it didn’t work.
I got the ERR_*SSL*_VERSION_*OR*_CIPHER_MISMATCH error. I was investigating certificates and protocols for the whole day and couldn’t find a reason why staging—which works in the same way as production—worked, but production didn’t. I’ve found the reason by an accident, while reading one of the responses to this thread: “you can't put a CNAME at the root of a domain (i.e. example.com), but you can on a subdomain (i.e. www.example.com)”. Eureka! This was the only difference in my setup! Staging’s custom origin doesn’t use a bare domain, but the production does!
What I needed to do at this point was to change the CNAME in my CloudFront distribution so that it didn’t use root. Thankfully, our architecture has a proxy that adds www to the domain. I was then able to change the CNAME from myDomain.com to www.myDomain.com, and it worked!
It was worth it
Setting up CloudFront was hard work, required attention to tens of configuration details, but it paid off. The page is fast and much more reliable than it used to be. We’re glad that we’ve picked a custom solution of adding CloudFront (instead of adapting one of the Craft CMS caching methods), as it allowed us to stop relying on Craft's server in case of traffic peaks and move the responsibility to AWS.