

Kubernetes is a container orchestration system that allows users to manage deployments to a given environment (on premise or on the cloud) through defined manifest files.
Whether you're using Docker containers or something else, Kubernetes allows you to coordinate commands and reduce the complexity required to get a reliable environment up and running.
If you are new to DevOps, it can be hard to know exactly where to start learning this topic. There are many tutorials that talk about creating a server, creating Docker containers, and others that talk about deploying to Kubernetes. For beginners, the disconnected nature of these resources can make the learning curve feel even more overwhelming.
This article demystifies the process of deploying an app to a Kubernetes cluster by consolidating all of the steps into one easy-to-follow walkthrough. Beginning from step 0, this walkthrough will help you create a simple Express app that you can run locally, then package it and run it on a cluster. Yes, it’s that easy!
All of the libraries and tools you are going to use are free, so you can hands-on learn the basics of DevOps without breaking the bank. You’ll learn the basic commands and context so that you can see how the pieces fit together, with hands-on experience creating something from scratch, from start to finish. This will also give you some practical knowledge to make troubleshooting production issues easier, as practice lends to experience.
Prerequisites
You’ll need a few libraries and tools to run through this walkthrough. Some of these tools you may already have, such as Node. Also, if you already have an app that you want to containerize, you won’t need Express.js and you can skip those installation instructions. If you’ve never created a backend app, this is a good opportunity to get your feet wet!
| Tool | Reason | Installation |
| Node.js | The app uses a backend Javascript server environment. | Reference the Npm docs to install Node.js. |
| Npm | This is a package manager that is used by the app to manage dependencies. | Reference the Npm docs to install npm. |
| Express.js | This is a backend web application framework for building Node APIs and is a dependency for the app. | Use the npm command to install express:npm install express --save |
| Docker Desktop | This installs the Docker tools, including the docker cli and allows you to start a simple Kubernetes cluster. | Download Docker Desktop from their website, depending on your OS. |
| DockerHub | This hosts Docker images so that they are accessible from anywhere and in this case, Kubernetes. | Create a DockerHub user account from this website. |
| kubectl | This is a command-line tool used to set up and manage Kubernetes clusters and resources. | Download kubectl from the Kubernetes website, depending on your OS. |
Walkthrough
Enable Kubernetes,
Start off by enabling Kubernetes in Docker Desktop. This will create a simple, single cluster. A cluster contains a set of nodes that basically run the app. Installation takes a few minutes and requires an app restart. In the meantime, while it is installing, you can create your server app.
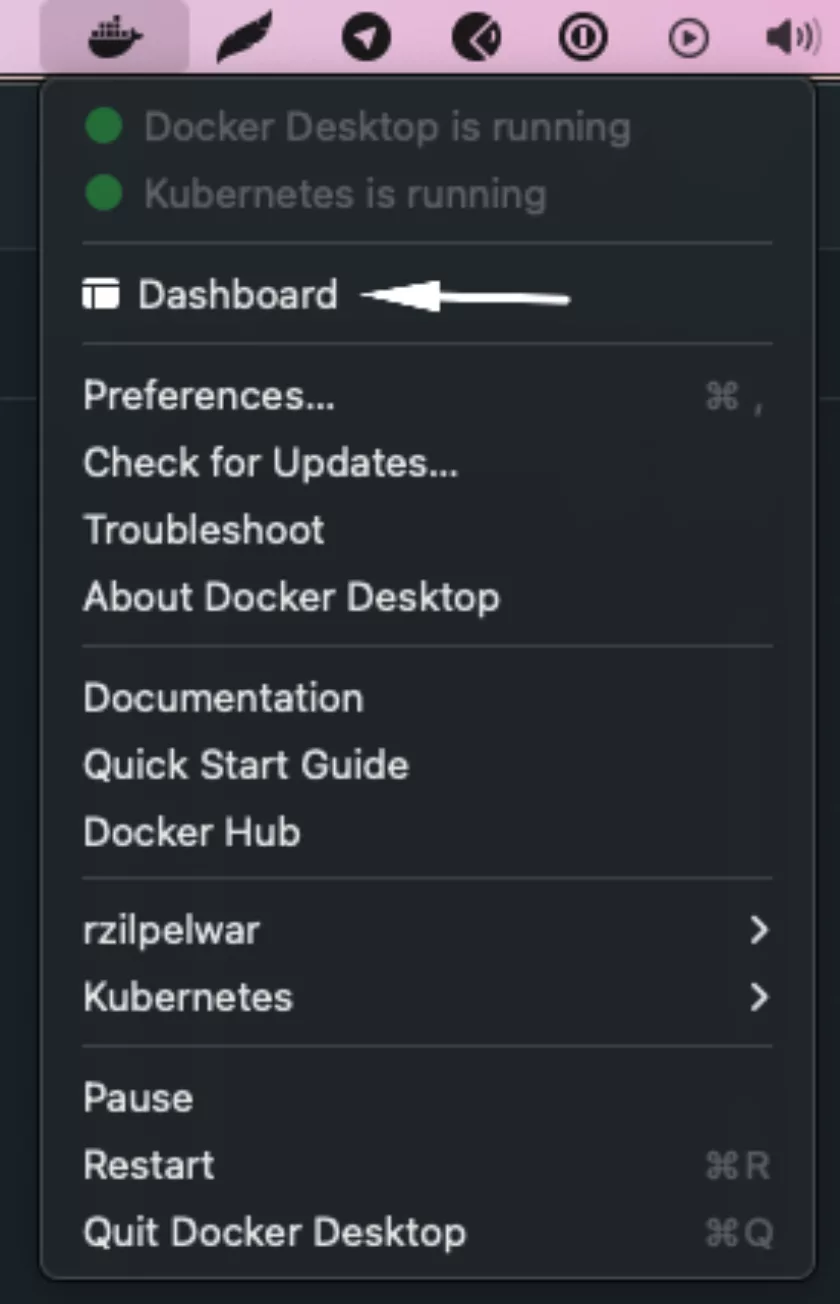
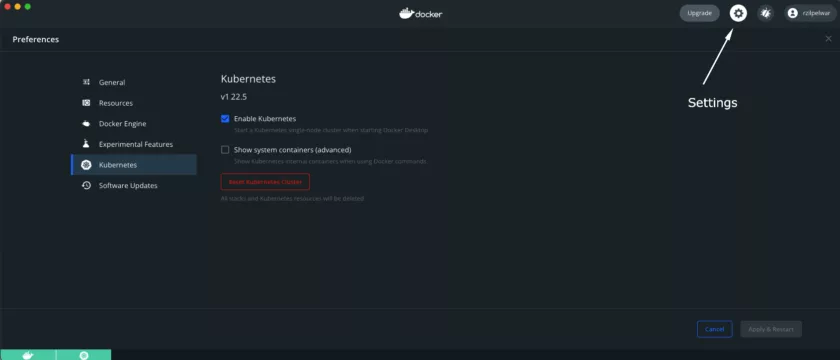
Launch Docker Desktop and:
Select Dashboard
Go to Settings via the gear icon
Select the Kubernetes section
Check the box for Enable Kubernetes
Allow installation to complete
Create an application,
The app is a basic Express server. It listens for requests and is set up to display some content when the user hits our home page.
Initialize a new source control repository for our the and install Express.
$ npm install express
+ express@4.18.2
updated 1 package and audited 103 packages in 0.621s
found 0 vulnerabilities
Initialize a package.json file that will manage the app’s dependencies. This should pick up express as an existing dependency and include it in the package.json file.
$ npm init
This utility will walk you through creating a package.json file.
It only covers the most common items, and tries to guess sensible defaults.

See `npm help json` for definitive documentation on these fields
and exactly what they do.

Use `npm install ` afterwards to install a package and
save it as a dependency in the package.json file.

Press ^C at any time to quit.
package name: (express-simple) express-simple
version: (1.0.0)
description: simple express app
entry point: (server.js)
test command:
git repository: (https://github.com/ranizilpelwar/express-simple.git)
keywords:
author:
license: (ISC)
About to write to /Users/ranizilpelwar/Code/study/express-simple/package.json
…[shows details of the package.json]
Is this OK? (yes) yes
Package.json for reference:
{
  "name": "express-simple",
  "version": "1.0.0",
  "description": "simple express app",
  "main": "server.js",
  "dependencies": {
    "express": "^4.18.2"
  },
  "devDependencies": {},
  "scripts": {
    "test": "echo \"Error: no test specified\" && exit 1",
    "start": "node server.js"
  },
  "repository": {
    "type": "git",
    "url": "git+https://github.com/ranizilpelwar/express-simple.git"
  },
  "author": "Rani Zilpelwar",
  "license": "ISC",
  "bugs": {
    "url": "https://github.com/ranizilpelwar/express-simple/issues"
  },
  "homepage": "https://github.com/ranizilpelwar/express-simple#readme"
}
Open up the folder in VSCode, or your IDE of choice. Store the logo image in a public/images folder.
Create an index.html file that displays a simple "Hello, World!" message. It also will render the logo, just to get a bit fancy.
Index.html file contents:
Hello World!
Create a server.js file on the root of the app to listen for incoming requests on port 8081 and serve the html file when the user lands on the given route. This port is important — take a mental note of it for later.
Server.js file contents:
var express = require('express');
var app = express();

app.use(express.static('public'));

app.get('/index.html', function (req, res) {
   res.sendFile( __dirname + "/" + "index.html" );
});


var server = app.listen(8081, function () {
   var host = server.address().address;
   var port = server.address().port;

   console.log("Express app listening at http://%s:%s", host, port);
});
Run your app locally.
Open a terminal and start up your server.
$ node server.js
Express app listening at http://:::8081
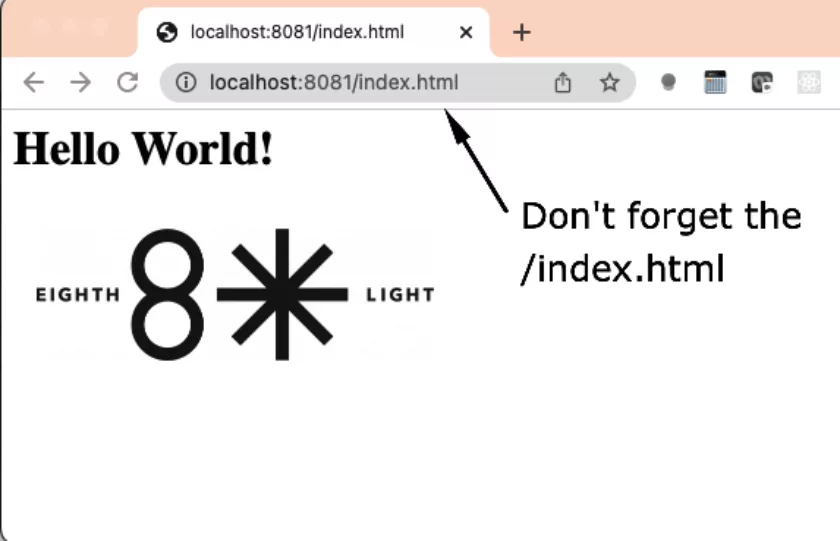
Open a browser and view your app locally at http://localhost:8081/index.html. You should see the “Hello, World!” message and the logo displayed below it.
Shut down your local server, as you won’t be accessing it directly going forward.
Terminal command: Ctrl + C
So far, you have an app that you can run locally. Next, you’ll want to containerize it and publish the image so that Kubernetes can access and install it. Our end goal is to see the app running from within Kubernetes.
Containerize your app.
Docker packages software into containers. You are going to create a Docker image which contains the application and the necessary environment in order to run it, which in this case is a Node environment.
Create a Docker image of the app. Don’t forget to add the period (.) at the end of the command, which indicates that you want to add all the files from our current directory.
In the example below, replace my name with the name of your DockerHub username.
$ docker image build -t rzilpelwar/docker-simple .
[+] Building 13.2s (11/11) FINISHED
 => [internal] load build definition from Dockerfile                                                                                  0.0s
 => => transferring dockerfile: 360B
…..
 => exporting to image                                                                                                                0.1s
 => => exporting layers                                                                                                               0.1s
 => => writing image sha256:6a200fab3301a3539aadb88bd8425a39692490b87accfb97111bc9bb0cb75802                                          0.0s
 => => naming to docker.io/rzilpelwar/docker-simple                                                                                   0.0s
Review the images you have.
$ docker image ls
REPOSITORY                                    TAG               IMAGE ID       CREATED              SIZE
rzilpelwar/docker-simple                      latest            6a200fab3301   About a minute ago   182MB
Push the image to DockerHub.
$ docker image push rzilpelwar/docker-simple
Using default tag: latest
The push refers to repository [docker.io/rzilpelwar/docker-simple]
4f6a7a4b0c8b: Pushed
5f70bf18a086: Pushed
468050fd1da8: Pushed
9eeae2a050d6: Pushed
f44e643b1143: Mounted from library/node
037d28bad50c: Mounted from library/node
f10b572371d9: Mounted from library/node
7cd52847ad77: Mounted from library/node
latest: digest: sha256:537779bbe6c9855fec10f1bacb023393944c0753b2939d882b752e58b45f0897 size: 1991
The image now exists on DockerHub.

Access the app from within a Docker container.
Remove the local image of the app to ensure that when you run it, you are getting it from the remote repository.
$ docker image rm rzilpelwar/docker-simple
Untagged: rzilpelwar/docker-simple:latest
Untagged: rzilpelwar/docker-simple@sha256:537779bbe6c9855fec10f1bacb023393944c0753b2939d882b752e58b45f0897
Deleted: sha256:6a200fab3301a3539aadb88bd8425a39692490b87accfb97111bc9bb0cb75802
Note, if you run the Docker image list command, the image will no longer appear.
Terminal command: docker image ls
Start up the container.
$ docker container run -d --name app -p 8000:8081 rzilpelwar/docker-simple
Unable to find image 'rzilpelwar/docker-simple:latest' locally
latest: Pulling from rzilpelwar/docker-simple
63b65145d645: Already exists
596dbc41bc23: Already exists
4d7764ae36ba: Already exists
60d21a72e3b7: Already exists
19b2fa247fe2: Already exists
b7d545cb982c: Already exists
4f4fb700ef54: Already exists
8350b6fc4ecd: Already exists
Digest: sha256:537779bbe6c9855fec10f1bacb023393944c0753b2939d882b752e58b45f0897
Status: Downloaded newer image for rzilpelwar/docker-simple:latest
6c058723182d8eddf3a77e5f9ce385670c9f623e414e65734db6596926e49258
It doesn’t find a local copy, so it retrieves it from the remote and displays the ID of the image on the last line.
Open a browser and view your app from the Docker container at http://localhost:8000/index.html. Note the port — you are using the port you mapped to Docker, not the port that the app listens on.
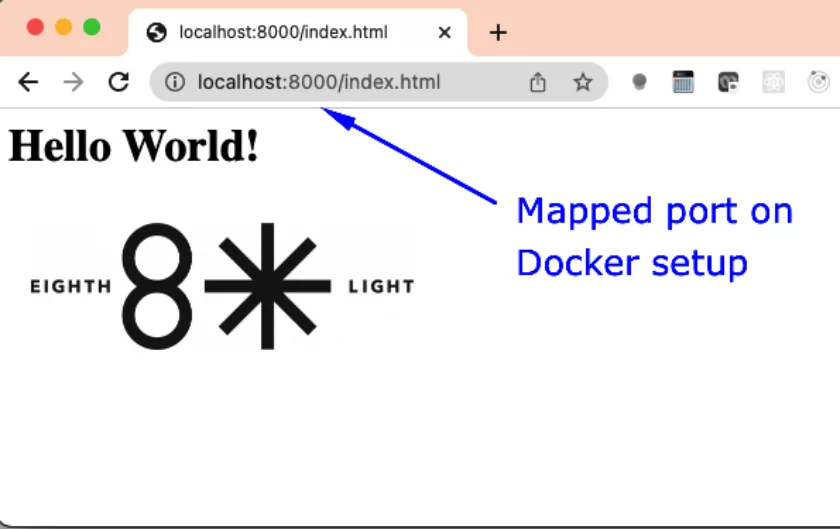
Note, if you try to run the app via port 8081, it will display an error because you don’t have it running locally anymore (as you shut down the Node server in an earlier step).
So far, you have a containerized app with the image stored and accessible remotely on Docker Hub. You are closer to our end goal of running the app from within Kubernetes.
Automate the deployment of your app.
YAML manifest files specify the desired state and Kubernetes takes care of all the details to get us there. The desired state, in this case, is to have one instance of our containerized app, accessible behind a service. Deployments handle updates and rollbacks and pods wrap the containerized app.
Create a deployment manifest to tell Kubernetes that you want one pod running your app. This is defined by specifying replicas: 1. Specify your app by providing the Docker image as:
image: rzilpelwar/docker-simple
Be sure to replace my Docker username with yours.
Deployment.yml contents:
apiVersion: apps/v1
kind: Deployment
metadata:
  name: app-deploy
  labels:
    app: node-svr
spec:
  replicas: 1
  selector:
    matchLabels:
      app: node-svr
  template:
    metadata:
      labels:
        app: node-svr
    spec:
      terminationGracePeriodSeconds: 1
      containers:
      - name: app-ctr
        image: rzilpelwar/docker-simple
        imagePullPolicy: Always
        ports:
        - containerPort: 8081
Post the file to Kubernetes.
$ kubectl apply -f deployment.yml
deployment.apps/app-deploy created
Review what got created. The setup is fast and you should see changes pretty immediately.
$ kubectl get pods
NAME                          READY   STATUS    RESTARTS   AGE
app-deploy-757d48fbb7-nmr2j   1/1     Running   0          108s
So now you can see that one pod got created.
Create a Service manifest that routes traffic to your pod.
Service.yml contents:
apiVersion: v1
kind: Service
metadata:
  name: srv-nodeport
spec:
  type: NodePort
  ports:
  - port: 80
    targetPort: 8081
    nodePort: 31234
    protocol: TCP
  selector:
    app: node-svr
Tell Kubernetes about your Service setup.
$ kubectl apply -f service.yml
service/srv-nodeport created
Review what services got created. Again, you will see changes immediately.
$ kubectl get services
NAME         TYPE        CLUSTER-IP   EXTERNAL-IP   PORT(S)   AGE
kubernetes   ClusterIP   10.96.0.1            443/TCP   3d6h
Access your app from within Kubernetes.
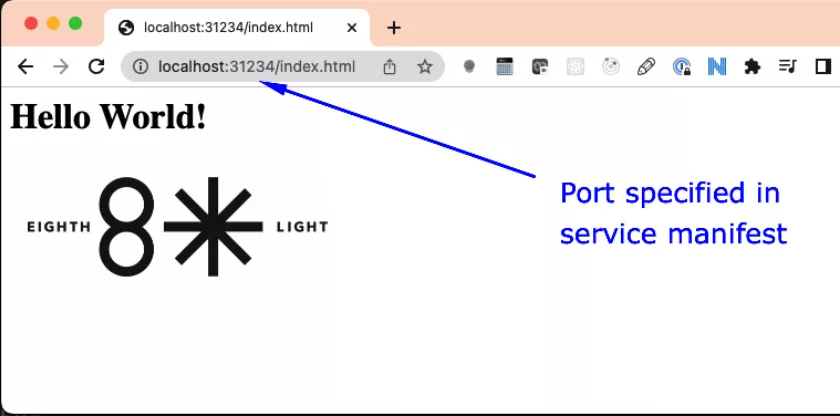
Open a browser and view your app from within Kubernetes at http://localhost:31234/index.html. Note the port — you are using the port you specified in our Service manifest yaml file. This routes traffic from the port specified for the service, to the containerized app in your pod, and finally to your app itself.
Now celebrate your success!
You have reached your end goal: to run the app from within Kubernetes! As you saw, it was really about executing a series of commands that packages up your app and server environment into a Docker image and configures that container onto a virtual environment.
Optimizing Kubernetes
Speed up development time.
Before wrapping up, I want to pause for a moment and dig into a real world situation where this Kubernetes cluster would be used. Say you have a bug in production and you need to make a fix. If you had to publish your Docker image every time you made a change, it would be a slow process. Based on how Kubernetes works under the hood, you can speed up your development time by having the deployment use your local image cache. Try this now.
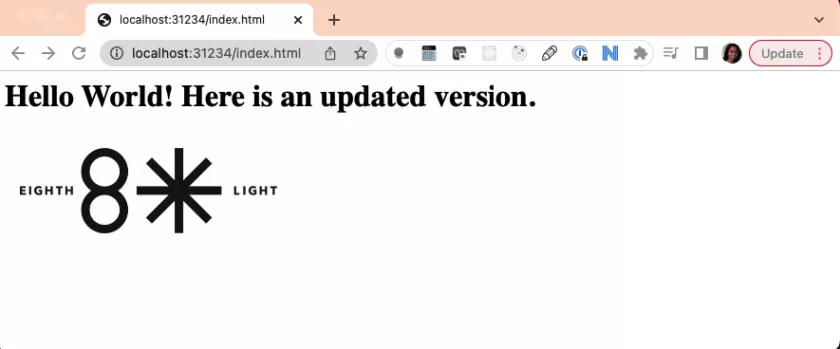
Change the message displayed on the home page, to simulate a bug fix.
Index.html contents:
Hello, World! Here is an updated version.
Build the local Docker image. Don’t forget the period (.) at the end of the command to indicate that you are using the files from the current directory. Also set the optional version tag for this image as 1.0.
$ docker image build -t docker-simple-local:1.0 .
Update the deployment manifest to reflect local image name and usages of local image cache changes, if they are found, by replacing these lines in the deployment.yml file:
image: docker-simple-local:1.0
imagePullPolicy: IfNotPresent
Post the changes to Kubernetes.
$ kubectl apply -f deployment.yml
Refresh the browser and confirm that the changes worked by using the port mapped in your manifest file.
Now that the walkthrough is complete, make sure to leave things in a clean state and tear everything down.
Clean up.
Review what is currently running.
$ kubectl get deployments
NAME         READY   UP-TO-DATE   AVAILABLE   AGE
app-deploy   1/1     1            1           17s

$ kubectl get pods
NAME                          READY   STATUS    RESTARTS   AGE
app-deploy-5b98c54d6b-t7lm8   1/1     Running   0          23s

$ kubectl get services
NAME           TYPE        CLUSTER-IP      EXTERNAL-IP   PORT(S)        AGE
kubernetes     ClusterIP   10.96.0.1               443/TCP        3m2s
srv-nodeport   NodePort    10.111.15.233           80:31234/TCP   20s
Delete the Kubernetes resources you created.
$ kubectl delete -f deployment.yml
deployment.apps "app-deploy" deleted
$ kubectl delete -f service.yml
service "srv-nodeport" deleted
You can confirm that the pod, deployment, and service that you created are no longer running by running the same get commands again.
$ kubectl get deployments
No resources found in default namespace.
$  kubectl get pods
No resources found in default namespace.
$ kubectl get services
NAME         TYPE        CLUSTER-IP   EXTERNAL-IP   PORT(S)   AGE
kubernetes   ClusterIP   10.96.0.1            443/TCP   5m11s
Success!
Final Thoughts
Having a basic understanding of DevOps is a good way for developers to help streamline the software development lifecycle and improve collaboration and communication with other teams.
Even if you aren’t involved in setting up the infrastructure, a basic understanding of how things work can be useful when troubleshooting production incidents.
If your company needs help setting up or managing services and infrastructure, reach out to 8th Light to see what our consultancy services can do for you.


