In dApps, this process can serve as an interesting substitute for the old Web2.0 user and password sign-in method: there is no account or strong password to remember and avoid losing, it’s reusable in every app that supports it, and you control your private key instead of trusting the server to safely store your password.
FREE BUYER'S GUIDE Is Web3 for Me?Web3, cryptocurrency, and blockchains have been in our lexicon for years, but there's still little agreement on their advantages and applications. In this short overview, we bring some clarity to the space — defining key terms, exploring new use cases, and reviewing the new paradigm's fundamentals so you're prepared to make confident and proactive business decisions. |
 |
In this post, I’ll explain the process needed to use Ethereum signed messages to sign in to a dApp, and later, explain its implementation in a React frontend with a Go backend. I’ll be using the Ethereum Improvement Proposal 4361 (EIP-4361) to comply with current standards and best practices.
How the Signature Works
Building from the bottom up, the process is: First, assume a user has control over an Ethereum address. This means the user has access to the address’s private key. If the user signs the message “Hello World” using the private key, it’ll produce a scrambled sequence as the output of the ECDSA cryptographic signature. A decoder can use the original message plus the random-looking string to recover the public key (address) of the signer entity. This provides cryptographic proof that the signer of the message owns the corresponding address and its private key. Take a look at the example below.
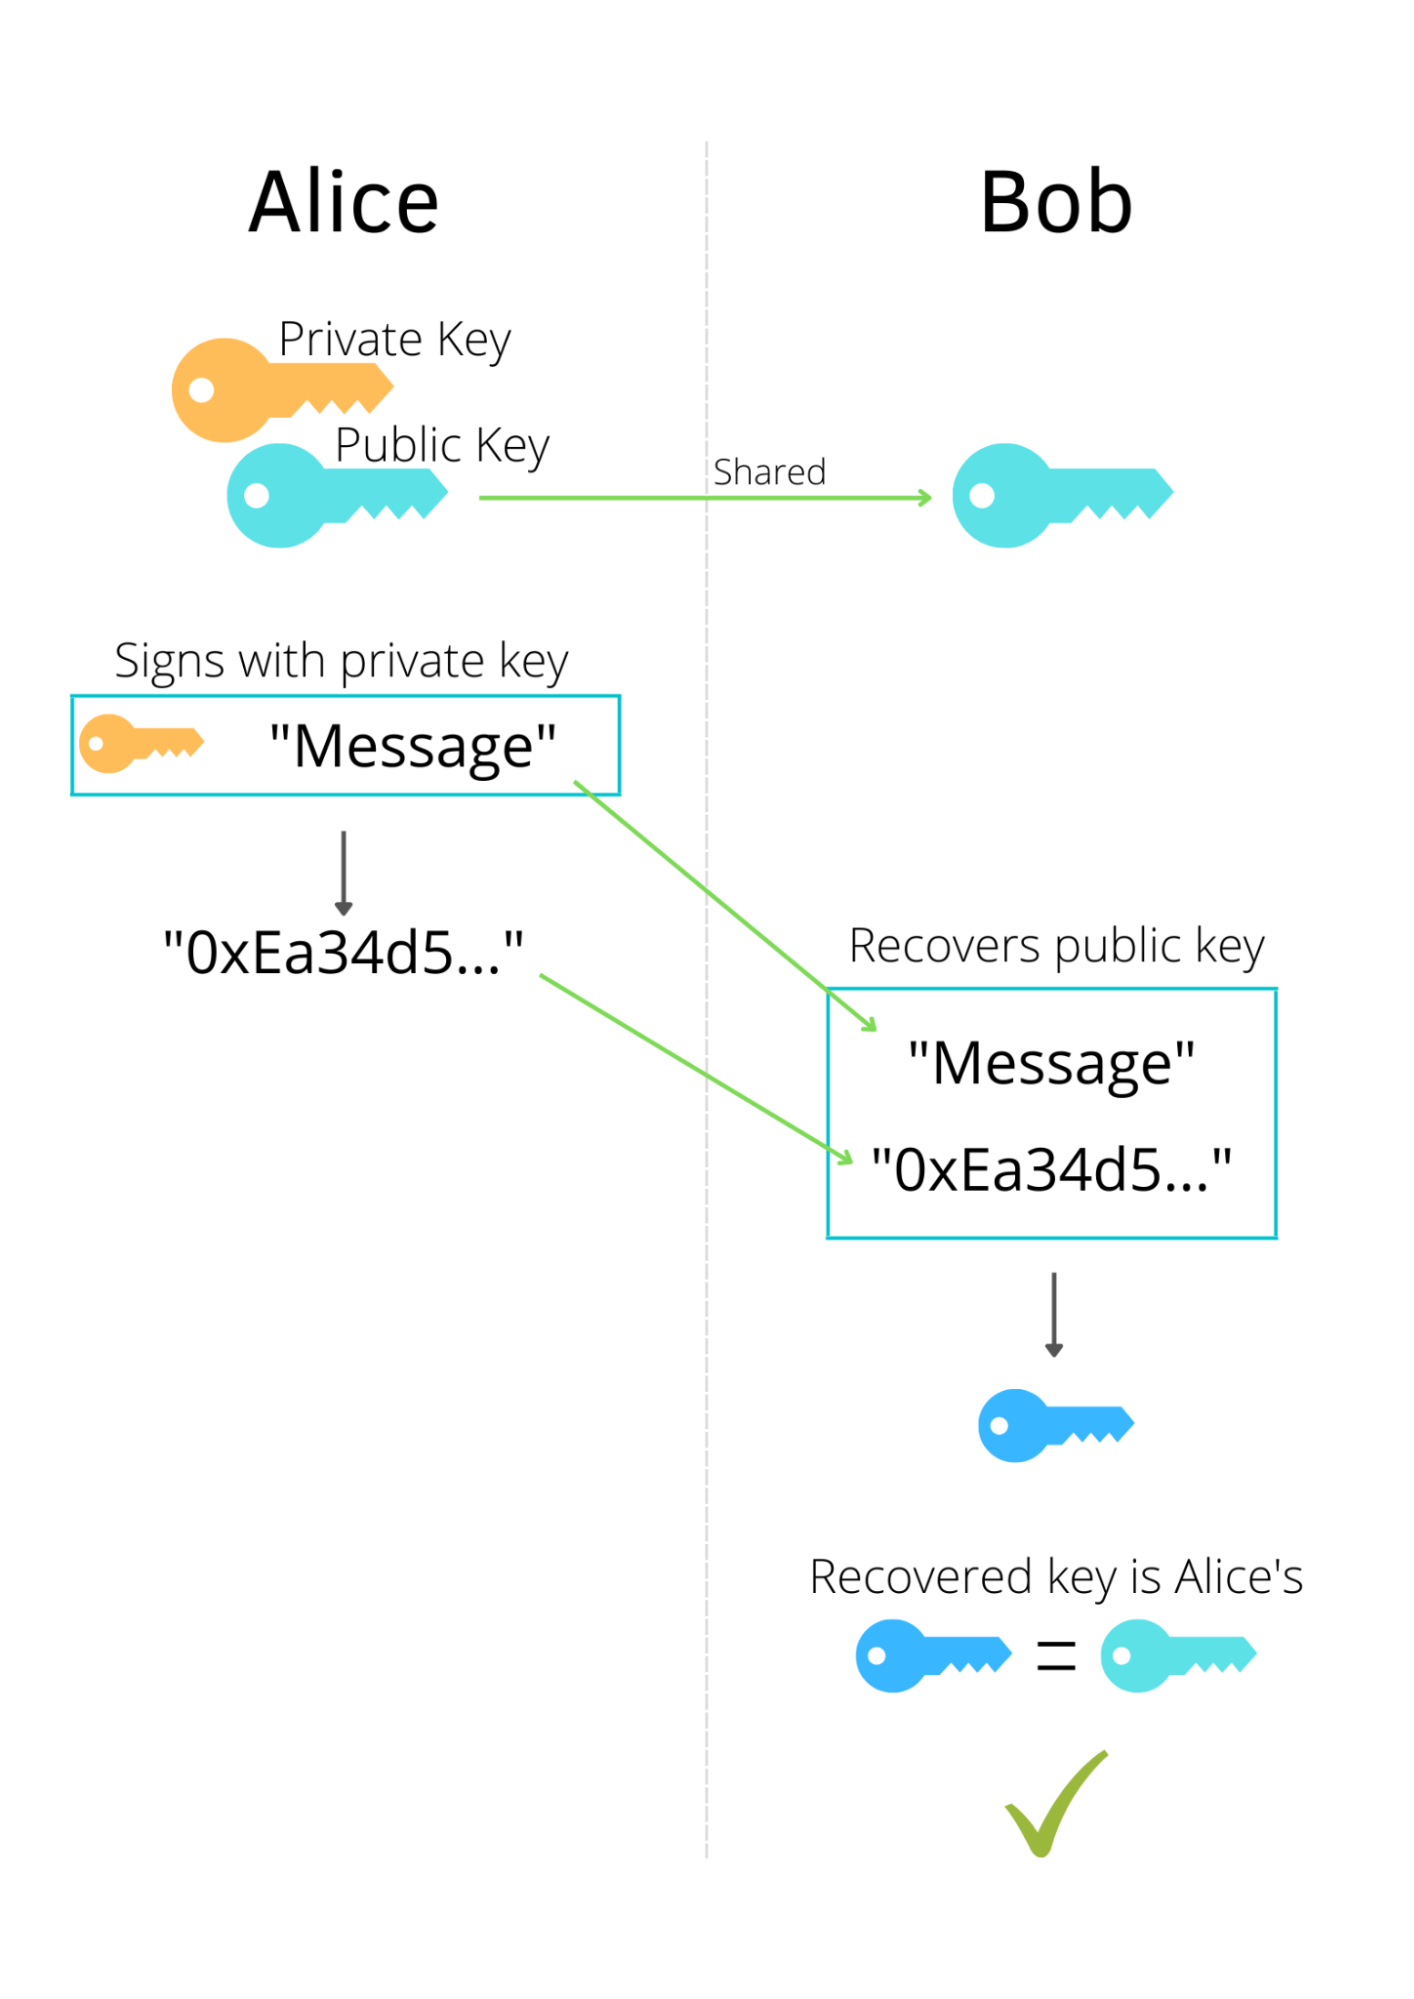
This example is almost enough to authenticate Alice into Bob’s application (there are some security concerns that I cover later in this post). Imagine Alice being the frontend, and Bob being the backend. If Bob has verified the cryptographic signature of the message, he can send a session token to Alice so that she can perform privileged requests, just like any other web application. This works because only the owner of Alice’s address can sign a message in this specific way to authenticate her identity.
Now, if someone gains access to a user’s wallet, they can sign the message and enter the app, exactly the same way that someone can enter your social media accounts if they steal your username and password. With Sign-in with Ethereum, trust is delegated to ownership of an address, instead of ownership of a username and password.Think of signing in to dApp with your Ethereum wallet as a similar process to the one-click sign-in YouTube leverages when you use your Google account.
Sign-In with Ethereum
There are additional security risks that need to be addressed with this new sign-in method. First, if someone intercepts your signature, they can use it in a replay attack to sign in to your account whenever they want. Worse, all EVM compatible chains use the same elliptic curve (secp256k1) and ECDSA signing algorithm, meaning a single signature could be valid in multiple chains. To address this concern, Chain IDs were introduced in EIP-155. Another security measure is specifying which chain your signed message is addressing.
Adding some constraints that allow the backend to authenticate your request will also give you some additional security. Think about it this way: if we don’t want a signed message to be replayable on another chain, we can include the Chain ID in the message content; if we don’t want it to be replayable after a certain time, we can include a timestamp; and if we don’t want a signed message to be replayable ever, we can include a number that is only used once (nonce) in the message content. If anything in the content changes, the signature will also change. With this information, the server can now do things like verifying the expiration date, and abort the authentication if the date is in the past.
That’s the thinking behind Ethereum Improvement Proposal #4361: Sign-in with Ethereum (EIP-4361). Per its abstract: “Sign-in with Ethereum describes how Ethereum accounts authenticate with off-chain services by signing a standard message format parameterized by scope, session details, and security mechanisms (e.g., a nonce).” This is the signed message format specified in this proposal:
${domain} wants you to sign in with your Ethereum account:
${address}

${statement}

URI: ${uri}
Version: ${version}
Chain ID: ${chain-id}
Nonce: ${nonce}
Issued At: ${issued-at}
Expiration Time: ${expiration-time}
Not Before: ${not-before}
Request ID: ${request-id}
Resources:
- ${resources[0]}
- ${resources[1]}
...
- ${resources[n]}
A nonce is a “number only used once.” In our case, it’s a piece of text that makes the signed message unique, and thus, makes its signature valid for a single occasion. The philosophy behind the nonce is that it needs to be stored in the backend, and it is updated on every successful authentication request.
Bob now needs to keep track of two things for Alice (and for every other user): her address, and her given nonce. Next, I’ll explain how you build this server functionality in Go.
Building the Verifier: Backend in Go
As the Ethereum protocol is open source, there are multiple libraries implementing it in multiple languages. “Go Ethereum is one of the three original implementations (along with C++ and Python) of the Ethereum protocol.” Go Ethereum is usually called “geth”, and it is the Ethereum reference client for the execution layer. In addition to running as a command line client, “go-ethereum” exposes common client libraries for working with Ethereum.
go get github.com/ethereum/go-ethereum
Create the following verification function. It takes an address, a signature in hexadecimal format, and an expected message as a byte array, and returns true if the signature is valid. Consider this: the signature is symmetric, meaning there are two valid signatures for each point in the curve (this is called “signature malleability”). The V value in the function must be 27 or 28 to represent which “side” of the curve is used for the signature, but go-ethereum needs that V value to be changed to 0 or 1 as you will see in the following example.
package main


import (
   "github.com/ethereum/go-ethereum/accounts"
   "github.com/ethereum/go-ethereum/common/hexutil"
   "github.com/ethereum/go-ethereum/crypto"
)


func VerifySignature(from, sigHex string, expectedMsg []byte) bool {
   sig := hexutil.MustDecode(sigHex)


   expectedMsg = accounts.TextHash(expectedMsg)
   sig[crypto.RecoveryIDOffset] -= 27 // Transform yellow paper V from 27/28 to 0/1


   recovered, err := crypto.SigToPub(expectedMsg, sig)
   if err != nil {
       return false
   }


   recoveredAddr := crypto.PubkeyToAddress(*recovered)


   return from == recoveredAddr.Hex()
}
Here’s an example of a unit test. The expected message and signature were taken from this gist.
package main_test


import (
   "my_project/main"
   "fmt"
   "testing"


   "github.com/stretchr/testify/assert"
)


// Test having the correct signature and address returns true
func TestVerifySignature(t *testing.T) {
   authService := auth.AuthService{}
   correct := authService.VerifySignature(
       "0x0EaE3eF6CC7176553E6B45d94e9eFDE2Da7B82a5",
       "0x34850b7e36e635783df0563c7202c3ac776df59db5015d2"+
           "b6f0add33955bb5c43ce35efb5ce695a243bc4c5dc4298db4"+
           "0cd765f3ea5612d2d57da1e4933b2f201b",
       []byte("Example `personal_sign` message"),
   )


   assert.True(t, correct)
}
Now you can use this function in your application flow to verify that the signature was done by a given address. You’ll need to check that the message contains the right nonce, but you can do that before verifying the signature.
Your backend will need a table titled users that contains an address, and a nonce. This is the logic that you want in your backend’s authentication endpoint. Let’s call this endpoint POST authenticate:
- The backend receives a plain text message, its hexadecimal signature, and a user address.
- It uses the address to query the user’s current nonce.
- The plain text message contains that same nonce. Otherwise, abort the authentication.
- The address can be obtained from the plain text message and its hexadecimal signature (with the previous VerifySignature function).
- If everything is correct so far, change Alice’s nonce in the database
- Create a session token and add it to the response.
You might have intuitively guessed that this process requires Alice to have prior knowledge of her current nonce. There needs to be a different endpoint where Alice should be able to retrieve it. This endpoint needs to be public since it hasn’t yet been authenticated by Alice, and it’ll always return the latest nonce. As Alice’s address is public and will be passed around in other requests, you can use Alice’s address to query for her nonce and return it here. Let’s call this endpoint GET nonce. The client thus needs to call GET nonce first, then build the signature and finally call POST authenticate.

Building the Signer: Frontend with React
As with the backend, many libraries can sign using the ethereum protocol. Keep in mind that in order for this to work, the signer’s wallet needs to be connected to the browser and into the application — think: Metamask. Connecting a wallet and signing a message are two different things. For this post’s purposes, the signature is created using Wagmi and it is assumed that the wallet is already connected. Wagmi is “a collection of React Hooks containing everything you need to start working with Ethereum.”
Add wagmi and ethers to your project:
npm i wagmi ethers
Some of these lines are optional, so create a function createMessage that receives all the parameters that you need to fill it. And add a component that will create the signature and authenticate. If you connect your wallet using Metamask, the message will be shown to the user before it is signed. Because your app is already connected to the wallet, the user’s address should already be available, so we use it as a prop in this element.
First, create a functional component that receives the user’s Ethereum address and some child components that will only be rendered when the user is verified.
import { useState } from 'react';
import React from 'react';
const SignMessage = ({ address, children }:
React.PropsWithChildren<{address: string}>): JSX.Element => {
const [verified, setVerified] = useState(false);
const [errorMsg, setErrorMsg] = useState("");
const loginWithEthereum = () => {
// The signature process will start here
}
return (
{/* Click this button to start the authentication process */}
{verified && ( // Only show the child elements if it is verified
{ children }
)}
{error && Signature Error: {error.message}}
{errorMsg && Auth Error: {errorMsg}}
)
}
Before starting the signature, you need to fetch the nonce from the backend:
import { useSignMessage } from 'wagmi';


const SignMessage = ({ address, children }:
   React.PropsWithChildren<{address: string}>): JSX.Element => {
   // ...


   const loginWithEthereum = () => {
       fetchNonce(address) // The signature starts by fetching the nonce
   }


   const fetchNonce = (address:string) => {
       jsonGET( // jsonGET is a custom function that adds the headers and calls the API
           "/users/nonce",
           new URLSearchParams({address: address}) // use the address to fetch the right nonce
       )
       .then(response => {
           if (!response.ok) { throw response }
           return response.json()
       })
       .then((user:{nonce:string}) => { // receive the nonce
           createSignature(user.nonce)  // Now we can start the signature process
       })
       .catch((error) => {
           error.json().then( // Handle the error however you see fit
               (errorJSON: {message:string}) => {
                   setErrorMsg(errorJSON.message);
               }
           );
       });
   }


   const createSignature = async (nonce:string) => {
      // We need to create the plain text message and then sign it
   }


   // ...
   // return (...)
}
Then, create a function that receives your signature parameters, and build the text message complying with EIP-4361. The nonce used can be anything you want, as long as it’s at least 8 alphanumeric characters long and changes on every request:
const createMessage = (address:string, nonce:string): string => {
   // Substitute this message with the parameters you need for the EIP-4361 standard
   return (
       "myApp.com wants to sign in with your Ethereum account:\n" +
       address + "\n" +
       "\n" +
       "Log in to My App" + "\n" +
       "\n" +
       "URI: https://myapp.com/login\n" +
       "Version: 1\n" +
       "Nonce: " + nonce + "\n" +
       // "Chain ID: " + chainId +"\n" +
       // "Issued At: " + issuedAt + "\n" +
       // "Expiration Time: " + expiresAt + "\n"
   );
}
Now sign the message using wagmi’s useSignMessage function:
// import ...
import { useSignMessage } from 'wagmi';


const SignMessage = ({ address, children }:
   React.PropsWithChildren<{address: string}>): JSX.Element => {
   // ...
   const { error, isLoading, signMessageAsync } = useSignMessage()


   // ...


   const createSignature = async (nonce:string) => {
       // Create the plain text message
       const message = createMessage(address, nonce)
       // Wait for user approval and signature
       const signedMessage = await signMessageAsync({ message })
       // Send the message and signature to the backend
       authSignature(message, signedMessage)
   }


   const authSignature = (
       message:string, signedMessage:string
   ) => {
       setVerified(false);
       // Call the backend API here
   }

   // ...
   // return (...)
}
Finally call the POST authenticate endpoint in the backend and set the component’s state to “verified” if the response is successful:
// import ...


const SignMessage = ({ address, children }:
   React.PropsWithChildren<{address: string}>): JSX.Element => {
   // ...


   const authSignature = (
       message:string, signedMessage:string
   ) => {
       setVerified(false);
       jsonPOST( // jsonPOST is a custom function that adds the headers and calls the API
           "/users/auth",
           JSON.stringify({
               message: message,
               signedMessage: signedMessage,
           })
       )
       .then(response => {
           if (!response.ok) { throw response }
           return response.json()
       })
       .then(() => {
           /*
             In this moment your app received an authentication header
             that allows the user to access protected resources.
           */
           // Set the verified state of the component to true
           setVerified(true);
       })
       .catch((error) => {
           error.json().then( // Handle the error however you see fit
               (errorJSON: {message:string}) => {
                   setErrorMsg(errorJSON.message)
               }
           )
       })
   }

   // ...
   // return (...)
}
Depending on your session implementation, a session token could be included in a header, or a cookie. Using this token in protected endpoints would give your user access to authenticated resources, just like any other Web2 app. This component will not “remember” that the returned session token is still valid, (e.g. if the user refreshes the page) so take that into account for your own application.
Wrapping Up
By using React and Go, this authentication workflow complies with the EIP-4361 standard. Your application will trust the client side without needing the user to manage another username and password.
The EIP-4361 standard may change in the future, so be sure to stay up to date. You can check the official Sign-In with Ethereum site at login.xyz. The spec is actively developed and they have links to libraries, a Discord for support, and weekly community calls for contributors and integrators. There are many implementations for the same detailed building blocks: the wallet connection, the signer, and the verifier, so try the one that fits your needs the most.