Last year I wrote a RubyCocoa tutorial that’s been aggregated in a few places and referenced a couple times. By my standards it was an overwhelming response. A few things have changed since then, most notably Mac has embraced Ruby.
It’s installed with Leopard, RubyCocoa has been put on it as well, all of which is great news. The drawback is that my tutorial has gone out of date, as Xcode has changed too. Guess I’m gonna have to write a new one.
Naturally my first thought was to update the original tutorial, with new pictures, but I’ve got two problems with that. One, it’s boring. Not for you—for me! Large portions of it haven’t changed aside from some differences in the screenshots and installation.
Why should I explain what Cocoa is again? I just couldn’t get motivated. The second is that I have an issue with the way programming APIs are taught. Why is it that developers, such as myself, who have embraced testing abandon it in example code?
This is especially true in GUI code, where often the simple examples have more complicated tests. Unit testing is so important we should be able to teach APIs Test-First, and in that spirit we’re going to a classic example of TDD using RubyCocoa.
This should teach you how to get up and running and well as make the tutorial a heck of a lot more interesting. For me anyway.
Bowling
If you’d like to see about 4000000 examples of the bowling game head over to Ron Jefferies website at xprogramming.com. It’s a typical example of solving an algorithmic problem using TDD, and often used as a kata or practice session. We’ll do this following Uncle Bob’s three rules of TDD:
- You are not allowed to write any production code unless it is to make a failing unit test pass.
- You are not allowed to write any more of a unit test than is sufficient to fail; and compilation failures are failures.
- You are not allowed to write any more production code than is sufficient to pass the one failing unit test.
We’ll use RSpec for this exercise.
Basics
If you aren’t familiar with Cocoa at all, take a peek at the “What the Heck is Cocoa” section here.
Installation
If we want to make an awesome bowling game using RubyCocoa we’re going to need to install RubyCocoa. This tutorial is assuming you’re using Leopard, which means you have two steps. The first is to install Xcode from the disc that came with the operating system.
I’m not going to explain that here, I assume you can open a disc and click an installation. For adding RubyCocoa so we can write this slick Mac App you have three options:
- Install from source. A big part of the reason you haven’t seen this doc earlier is because I’ve repeatedly attempted to install from source, and failed miserably before getting it right.
- Install from the latest binary release.
- Do absolutely nothing, say it again. If you’re on Leopard, it’s already there for you.
Step three sounds tempting but there’s a catch. If you’ve used MacPorts to update Ruby, you may find that your Ruby and RubyCocoa installations don’t match up. See Verifying your installation below. Because of this I highly recommend the “do nothing” choice if you can get away with it.
The latest Apple Software Update even updated the bridge, so you won’t be very behind anyway. We also need RSpec as we’ll be using it for our unit testing.
sudo gem install rspec
The great thing about RSpec is it reads extremely well to the uninitiated, so I won’t be explaining RSpec as I go.
Verifying your installation
After installing however you want to install, go to irb and type require ‘osx/cocoa’. If you get true then your system is setup properly for rubycocoa development. If not you may need to tweak some environment variables, or worse install from source. I’ll have a blog post on that soon.
Your first project
We’ll need to create a new RubyCocoa project. Start up Xcode and create a new Cocoa-Ruby project.
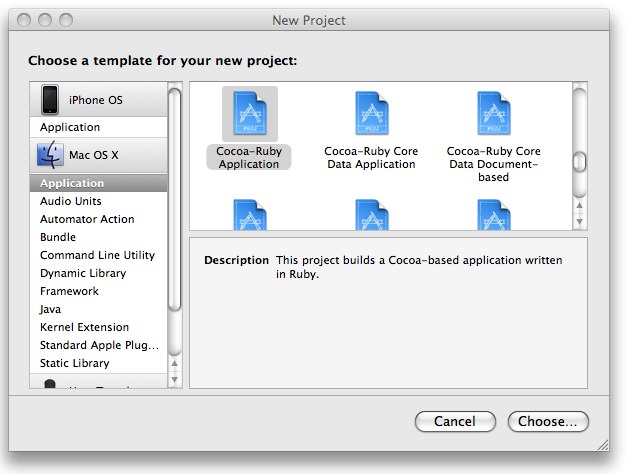
Your screen will probably look different, unless you have the iPhone development kit installed too. The important thing is that you select Cocoa-Ruby application. Create the project with whatever name you like, as long as you call it bowling.
This will generate an application skeleton in Xcode. Let’s create our super slick bowling game interface in Interface Builder. Double Click Main Menu.nib in your Xcode project file. From there you should get windows like the following (I’ve arranged them to fit the window better):
Your Window won’t be there yet. In the Nib Document window, that’s the one with MainMenu.nib on top, double-click the Window icon. That Window represents your dialog box.
You can see it on the screen in the picture above. Now select the Window icon again and hit Apple-Shift-I to bring up the Inspector for that window.
This shows the properties for the Window at the moment, but will change whenever you select a different object. Change the name of the window to bowling now. Our bowling game is on the honor system.
You enter your score, press roll, and it tells you the running tally of your current score and your current frame. This is a little different than the typical implementation, since those simply spit out a total score after all your rolls.
First you need a button so lets select a push button from the Library and drag it to the window. The easiest thing to do is in the bottom spotlight window type Push Button and it will find that button for you.
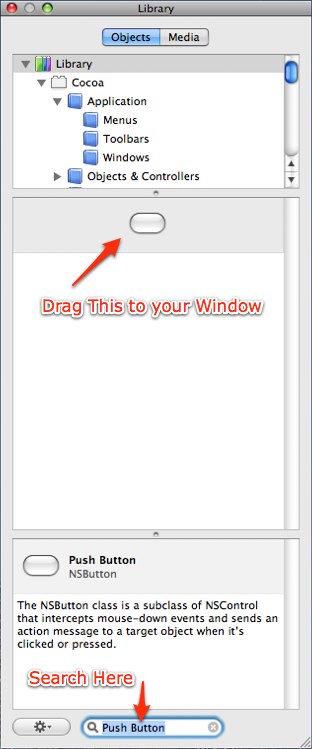
Drag the push button onto your window. You can rename it to roll simply by double-clicking on the button and changing the text. Let’s make a dialog that looks like this:
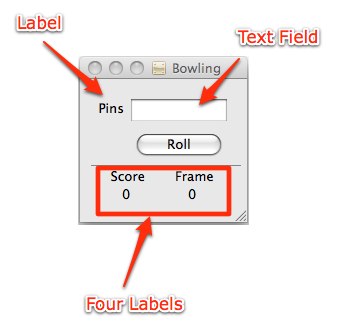
I admit not my best work as designs go, but the focus of this tutorial is test-driven GUI code not Interface Builder. This dialog is made up of one Text Field and five Labels. You should be able to search for them just like you did for the Push Button.
The important thing to remember is that there are four labels on the bottom. Two for the headings (Score and Frame) and two for the actual totals (currently 0 and 0). Congratulations we have our dialog box.
If you go back to the Xcode view and click Build and Go you’ll see the exact same view. Of course nothing does…anything. That’s why we need to write some code…er tests. Remember rule #1:
- You are not allowed to write any production code unless it is to make a failing unit test pass.
Normally at this point we’d start making outlets, actions, and connections but we’re not going to do that here. The reason? We don’t have tests. Have I said that enough yet?
To get up and running with RSpec it’s really best to open up your project in something like Textmate but since this is a tutorial and I can’t make you use my machine I’m going to assume you’ll be creating your files in Xcode and running the specs with the terminal.
Given that we have a view I think it’s safe to assume we’ll have a controller. Create a file called bowling_controller_spec.rb in the root of your project.
As a rule you’ll want have a separate location for your specs, but this will work just fine for our project. If you’re using the Xcode interface you can use the Ruby test case class, we’ll be removing all the code anyway so it doesn’t really matter, the important thing is to create the file.
Do not add it to the Bowling target, this isn’t shipped as part of the product. Our first spec is going to have well—nothing. Remove any generated code in that spec and replace it with this:
describe BowlingController do
end
To run it you can use the terminal and type spec bowling_controller_spec in your Bowling directory. You should see this:
$ spec bowling_controller_spec.rb
./bowling_controller_spec.rb:9: uninitialized constant BowlingController (NameError)
				from /opt/local/lib/ruby/gems/1.8/gems/rspec-1.1.3/lib/spec/runner/example_group_runner.rb:14:in `load'
				from /opt/local/lib/ruby/gems/1.8/gems/rspec-1.1.3/lib/spec/runner/example_group_runner.rb:14:in `load_files'
				from /opt/local/lib/ruby/gems/1.8/gems/rspec-1.1.3/lib/spec/runner/example_group_runner.rb:13:in `each'
				from /opt/local/lib/ruby/gems/1.8/gems/rspec-1.1.3/lib/spec/runner/example_group_runner.rb:13:in `load_files'
				from /opt/local/lib/ruby/gems/1.8/gems/rspec-1.1.3/lib/spec/runner/options.rb:85:in `run_examples'
				from /opt/local/lib/ruby/gems/1.8/gems/rspec-1.1.3/lib/spec/runner/command_line.rb:19:in `run'
				from /opt/local/lib/ruby/gems/1.8/gems/rspec-1.1.3/bin/spec:4
				from /opt/local/bin/spec:16:in `load'
				from /opt/local/bin/spec:16
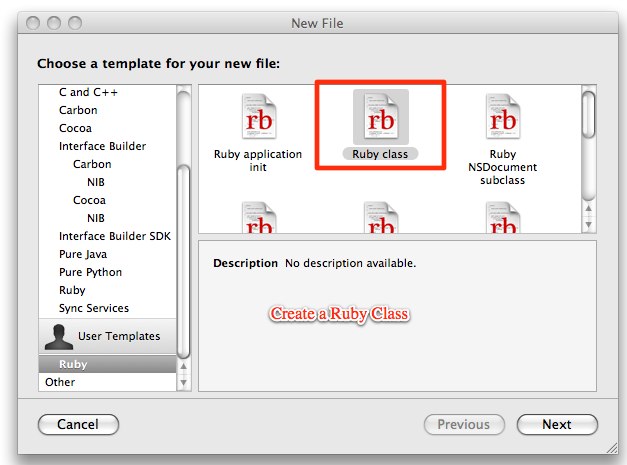
Congrats! You’ve got a failing test. What do we need to do to make that pass? We need a controller of course. Create a new class and call it BowlingController.
You need to use Xcode this time and make sure you add it to the Bowling Target, otherwise it won’t be executed later.

The class should look like this:
class BowlingController
end
Run the test—we…still don’t pass. We’ll need to require that bowling controller in our spec.
require 'bowling_controller'

describe BowlingController do
end
Well man we’re cooking with gas now. What does a BowlingController do? Well let’s go over some Cocoa concepts. In Cocoa objects have actions and outlets. An action is a method in your object that can be triggered by another Cocoa object.
An outlet is a reference to another object that was instantiated by Cocoa. Put more simply actions are methods, objects are things. So let’s look back at our glorious UI design.

Ahhhh. I could look at it all day. There is one action here, the pushing of the roll button. There’s three outlets: the score, the frame, and the number of pins. Can you see the difference yet?
Since we’re test driving the app we’re going to start with the action. First let’s write a test. Put this between the describe … end block in your spec:
before(:each) do
		@controller = BowlingController.new
end

it "should roll a ball" do
		@controller.roll
end
There’s a couple things worth paying attention to here. The before(:each) block will create the controller for each test. I think it’s a safe assumption we’ll have more than one. Second notice that our it block isn’t a coherent test yet. So why do we stop?
Because when we run that test it fails—roll is not a method. That’s enough to make us write some code to make the test pass. These cycles should typically take less time than it does for me to explain them.
Now I know this seems stupid, and I almost certainly wouldn’t write my tests at this granular a level if this wasn’t an example, but when I write my tests this small a few things happen. Firstly my code is almost always better. The larger my tests the more room for error.
The second is my tests tell a story, which can be followed by the next guy through my code to see what I was doing. Finally whenever I mess up (quite frequently) I can always go back with a couple undos. Now quit you’re whining and let’s make the test pass.
class BowlingController
		def roll

		end
end
See that wasn’t so hard. Now let’s make that test more useful. When we roll a ball we get the value from the Text Field on the screen. We use outlets to reference other Cocoa objects, so we’ll need an outlet that references that Text Field. Let’s call it pins.
To get a value from a Text Field we can call one of many methods on the NSTextField class, in this case we know it is going to be an integer so let’s use the intValue method. This is demonstrated with a mock object, which is built into RSpec, and we’ll be adding this to our test.
it "should roll a ball and get the value from the pins outlet" do
		mock_text_field = mock('Pins')
		@controller.pins = mock_text_field

		mock_text_field.should_receive(:intValue).and_return(0)
		@controller.roll
end
I’m using the same test I did before, only I’ve extended it. I’ve said I should have a mock that receives the value intValue when the roll method has been called. What I love about this test is that it explains just how data is retrieved from the pins outlet, in an executable way.
Now lets run it…kaboom! There’s no pins= method. Broke my own rule didn’t I? We don’t have a method pins=, but we also know that mock object is going to fail. That’s two failures not one.
class BowlingController
		attr_accessor :pins

		def roll

		end
end
Okay we’ve got a new error:
‘Pins’ expected :intValue with any args once, but received it 0 times.
This is great, let’s call it and get it to pass.
class BowlingController
		attr_accessor :pins

		def roll
				@pins.intValue
		end
end
Okay we’ve got a passing test, but do we have a useful controller? I should say not. None of this code is aware of Cocoa, and we can fake this out all day but at some point we have to make this accessor a true outlet. The question is how do we make this object cocoa aware?
A quick lesson on the Cocoa class hierarchy. The base class is NSObject, which is represented in RubyCocoa as OSX::NSObject. In order to know about outlets, actions, and any grand Cocoa thing we’ll need to make our class a Cocoa object.
So before continuing to make roll more useful, let’s write a test for that.
it "should be an OSX::NSObject" do
		@controller.is_a?(OSX::NSObject).should == true
end
Run that spec and you get…hmm, uninitialized constant OSX. We’re going to need to require the files because even though when you’re running a RubyCocoa application everything is included for you we’re running our tests independent of the application.
Require ‘osx/cocoa’ at the top of bowling controller. Ah here it is:
'BowlingController should be an OSX::NSObject' FAILED
expected: true,
got: false (using ==)
./bowling_controller_spec.rb:18:
Make it inherit from OSX::NSObject and we’re good to go. See that? We just made a Ruby object inherit from a Cocoa object. Pretty cool eh? Now about that accessor—pins. I mentioned earlier that Cocoa uses outlets to communicate with the other objects in it’s world.
An accessor may make our test pass, but it won’t make our application work. We need it to be an outlet, and there we’ve got ourselves a problem. You see outlets aren’t really anything special at all from a programmatic perspective.
We wire those parts together in Interface Builder, save it to the Nib file, and when the Cocoa application starts up it figures out everything it needs to instantiate.
In fact in Objective-C they are declared with an empty macro, in RubyCocoa we use the command ib_outlets which just makes a writer attribute on the class. So how do we test this? Unfortunately, we don’t, breaking rule #3.
You see we could write everything without the tags, but Interface Builder wouldn’t magically find the attributes so we’d have to add them manually. Since tagging these objects as outlets doesn’t actually change behavior you can grind your teeth to tiny nubs and change the pins to an outlet:
class BowlingController < OSX::NSObject
		ib_outlets :pins

		def roll
				@pins.intValue
		end
end
We’ve got one other issue here, roll isn’t marked as an action. In the same vein as ib_outlets we’re going to mark this as an action with the ib_action delcaration.
lib_action :roll
def roll
		@pins.intValue
end
Also worth noting is that every Cocoa action has a sender, sent as a parameter, but I’ve omitted that here as we won’t be using it so it’s not necessary.
The typical Cocoa style is to keep it in as a parameter, because standard Objective-C Cocoa needs it, but I don’t understand why we need the clutter. From this point forward we need to implement the rest of the controller.
This blog is getting exceedingly long, so I’m going to just put the tests and the code, one at a time, until our controller is implemented.
Note I’ve added the mocks to the before(:each) because I’ll need them more than once.
before(:each) do
		@controller = BowlingController.new
		@bowling = mock('Bowling')
		@text_field = mock('Pins')
		@text_field.stub!(:intValue).and_return(10)
		@controller.pins = @text_field
end

...

it "should have an outlet to a bowling object" do
		@controller.bowling = @bowling
end

class BowlingController < OSX::NSObject
		ib_outlets :pins, :bowling
end

it "should send the pin value to the bowling object" do
		@bowling.should_receive(:roll).with(10)

		@controller.roll
end

ib_action :roll
def roll
		@bowling.roll(@pins.intValue)
end
Oops! Better setup the bowling object in the before each.
before(:each) do
		@controller = BowlingController.new
		@bowling = mock('Bowling')
		@text_field = mock('Pins')
		@text_field.stub!(:intValue).and_return(10)
		@controller.pins = @text_field
		@controller.bowling = @bowling
		@bowling.stub!(:roll)
end

it "should have an outlet to the score" do
		@score = mock('Score')
		@controller.score = @score
end

class BowlingController < OSX::NSObject
		ib_outlets :pins, :bowling, :score
end

before(:each) do
		...
		@bowling.stub!(:roll)
		@bowling.stub!(:score).and_return(100)
		@score = mock('Score')
		@controller.score = @score
		@score.stub!(:setIntValue)
end

...

it "should update the score with the new score from the roll" do
		@bowling.should_receive(:roll).ordered
		@bowling.should_receive(:score).ordered.and_return(100)
		@score.should_receive(:setIntValue).ordered.with(100)

		@controller.roll
end
I want to pause and point out we’ve got a new method here. This is where our tests come in handy. We can see from looking at the tests that setIntValue and intValue are called on outlets to get and set values from them.
We’re using mocks to demonstrate how we use that API, and by the way we’re building our tests we can see our tests tell the story of how this controller was built. You should also see I’ve made a bowling object, the Model in the MVC setup, that is also an outlet.
I’ve done that because once we’ve setup this controller and that object in Interface Builder, the Cocoa framework will properly handle the creation of the objects if they are outlets. Back to the code…
ib_action :roll
def roll
		@bowling.roll(@pins.intValue)

		@score.setIntValue @bowling.score
end

class BowlingController < OSX::NSObject
		ib_outlets :pins, :bowling, :score, :frame

		before(:each) do
				@frame = mock('Frame')
				@controller.frame = @frame
				@frame.stub!(:setIntValue)
				@bowling.stub!(:frame).and_return(9)
		end

		it "should have an outlet to the frame" do
				@frame = mock('Frame')
				@controller.frame = @frame
		end

		it "should update the current frame with the frame from the bowling object" do
				@bowling.should_receive(:roll).ordered
				@bowling.should_receive(:frame).ordered.and_return(9)
				@frame.should_receive(:setIntValue).ordered.with(9)

				@controller.roll
		end

		def roll
				@bowling.roll(@pins.intValue)

				@score.setIntValue @bowling.score
				@frame.setIntValue @bowling.frame
		end
end
Great! We’ve done it. We’ve implemented a controller that plays bowling. Unfortunately since it uses a bowling object we haven’t created it doesn’t actually…do…anything yet.
This blog post is really about RubyCocoa and not about bowling, which is an article on it’s own. So I’m going to just write a copy of bowling here and if you want to use it just save it into the same directory as your controller, although I recommend writing your own.
So we’ve got a controller and a model, now we must make Interface Builder aware of it and build our wicked awesome application. That’s right, it’s wicked awesome.
Open up Interface Builder and make sure you’ve got the Library window open. Go to Objects and Controllers and choose the NSObject.
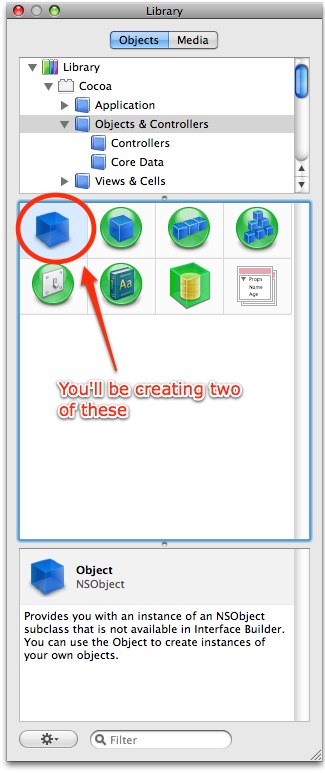
You’ll need to create two of these, one for each class in your application. Remember how they inherited from OSX::NSObject? Well drag the first NSObject over to the Nib Document window.
Using the inspector name it BowlingController. Then, and this is the cool part, open finder and drag the bowling_controller.rb file into the Nib Document window. There will be a brief pause then open the Inspector again. You should see something like this:
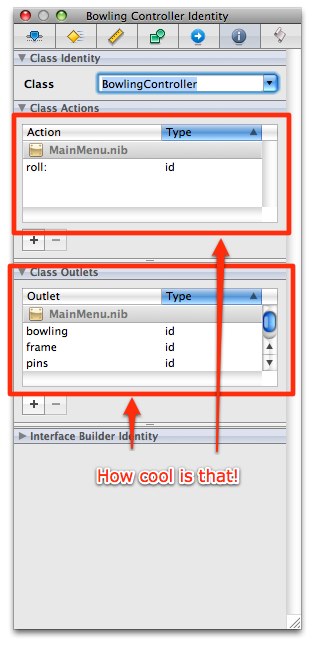
See those outlets and actions? Previously we had to do all that in Interface Builder, and get it right the first time, otherwise regenerate it. There were ways around it, but I much prefer this way. Anytime you’ve changed the outlets and actions you simply drag the new class.
Now do the same thing with the bowling class. The outlets and actions are are in the Nib File, along with their associated implementation, but your Cocoa application still doesn’t know how are they connected.
Pause and take a minute to think about this, how does BowlingController know what pins points to? How about bowling? The answer is it doesn’t, we’ll be embedding that information into the Nib file here.
To do that you drag from the item that needs to know something to the item it needs to know about. Let’s try this with our famous action, the Roll button. Hold the ctrl key and drag to the bowling controller.
Unfortunately I can’t get a screenshot since I can’t ctrl-drag and take the nice shot at the same time, but what you should see is a blue line from the Roll button that you’ll drag to the bowling controller.
When you let go the screen should flash Received Actions roll:, click the roll. To verify completeness open BowlingController in the inspector and click the Connections tab, that’s the blue circle with the error in it, and you should see something like this:
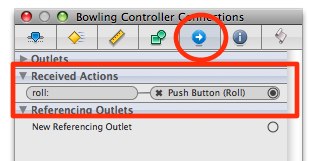
Under received actions it shows that roll: is connected to Push Button (Roll). Embedded in the Nib file is the information Cocoa needs to send the message roll to BowlingController when the button is pushed. Now we need to connect the rest of the conections.
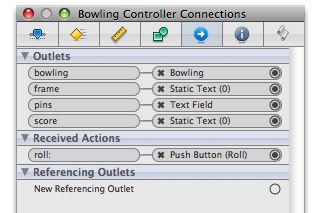
Connect from the BowlingController to the pins Text Field, the score, and the frame. Finally connect from BowlingController to the Bowling object.
Remember you’re going from BowlingController to the other objects because BowlingController is using those outlets.
Each time you’ll be asked to pick the proper outlet, and if you named your outlet properly this should be obvious. You should see this in your inspector for BowlingController when you are done.
Well build that puppy. Holy cow it works!
Well it should. If it doesn’t you may have made one of the classic blunders:
-
Did you make sure that
bowling_controller.rbandbowling.rbare in your build target? - Do all your tests pass?
- Did you save your Nib file?
- Are all you connections drawn?
Well that about does it for me, I hope this helped you learn a bit about TDD and a bit about RubyCocoa. Here’s a quick review:
Learned Concepts:
- What is Cocoa? What is RubyCocoa?
- Installing RubyCocoa
- Test-Driving your first controller
- Basics of Outlets
- Basics of Actions
- Connecting Outlets and Actions
- Instantiating Cocoa Outlets
- Importing Ruby classes into a Nib file
-
Inheriting from
NSObject - Getting a value from an outlet
Here’s hoping this helped put to bed the myth that GUIs can’t be tested as well.