Admit it, you’re new to Rails. You just got your new spiffy Rails job, and they gave you a Mac, formerly the computer of long-haired starving-artist types.
It’s got pretty apps with and even a Remote Control, and it’s got you thinking about making desktop applications. Then you remember the Resource Files, C++, Windoze, MFC. Ugh! Never mind.
If that sounds exactly right, well then you’re me and I want my body back, but if it sounds close to right then I have great news for you. RubyCocoa!
Started by Fujimoto Hisa and continued on at rubycocoa.sourceforge.net, RubyCocoa allows you to make complete OS X applications in Ruby, using all the features of the Cocoa framework.
There’s already a few applications out there in it, and a lot of great information, but what I found is that if you’re a complete newbie to Cocoa/OS X/Interface Builder and Objective-C like I was there’s no good step-by-step tutorial. Until now!
What the heck is Cocoa
Cocoa is an application framework for writing applications on OS X. That really doesn’t tell me much does it? How about a diagram:
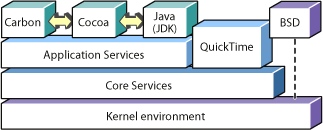
It’s an application layer on the Mac OS, with all the pretty buttons, scrollbars, and other such widgets that you expect from OS X applications. These are used through the Objective-C classes included in the framework of your application.
Wait, I know what you’re thinking, “C? Did you say C! Are you out of your mind? I’ve never been so lied to in my life!” Relax my friend and keep reading. I promise you there is no C in this tutorial, well except…
Objective-C
Objective-C is the preferred development language for applications on the OS X platform. It was originally developed by Brad Cox as an object-oriented extension to C, and is compiled in the gcc compiler. It’s primarily influenced by SmallTalk, much like Ruby.
If you know C or C++, and really if you are over 25 and a programmer you probably do, then you should be able to learn Objective-C quickly. Fortunately you don’t, but you will need to understand some bits and pieces of the syntax in order to translate Cocoa documentation to Ruby.
I’ll point out where this was done in the tutorial.
Getting RubyCocoa
You wanna write Cocoa apps in Ruby, you need RubyCocoa. All those Objective-C classes are available through Ruby calls, removing the need for such Objective-C necessities such as memory allocation and deallocation, keeping your code simple and beautiful.
Guess you’re going to have to install it. Here’s the subversion call:
svn co https://rubycocoa.svn.sourceforge.net/svnroot/rubycocoa/trunk/src rubycocoa
Next we need to build and install ruby cocoa. You’ll need Xcode installed for this to work, and for the rest of the tutorial to work. I’m assuming that you’ve been developing in Ruby for more than a few hours, so you’ve installed some gems.
If so you probably already had to install Xcode. If not then you’ll need to insert the OS X setup disc that came with your Mac and install it. I’ll wait. Sheesh that took a while. Next, from the directory where you checked out the source code, do the following:
$ ruby install.rb config
$ ruby install.rb setup
$ sudo ruby install.rb install
The preliminaries are over, let’s code.
Your first project
This is where the fun begins. We’re going to make an app together, and as we go I’ll explain the bits and pieces in baby steps. Afterwards hopefully you’ll know the basics of Cocoa as well as the basics of RubyCocoa.
I’m borrowing liberally from the basic tutorial done in Objective-C on Apple’s developer website[2], only done entirely in Ruby. If you’ve got 20 minutes, you can do this tutorial. It takes a half-hour in Objective-C.
Sadly to start we need to use Xcode. Maybe it’s me, and my bias against overcharged IDE’s, but I don’t like Xcode. It’s awful busy, and it’s code formatting in Ruby is…well my mommy told me if you can’t say something nice don’t say anything at all.
So start up Xcode and choose File-> New Project. If you installed your RubyCocoa bundle properly you should be able to select Ruby-Cocoa application from the menu.
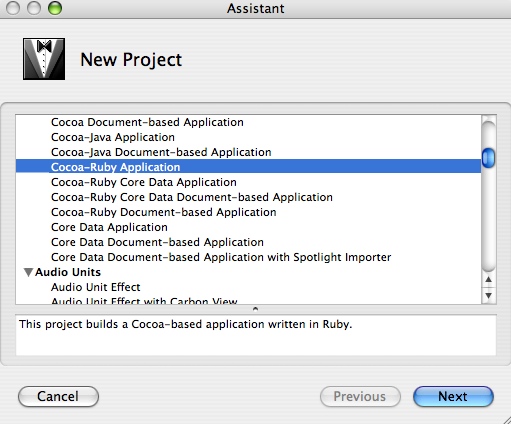
Create the Ruby-Cocoa application and name it Currency Converter. You can put it wherever you want. Once you’ve created it you should see this:
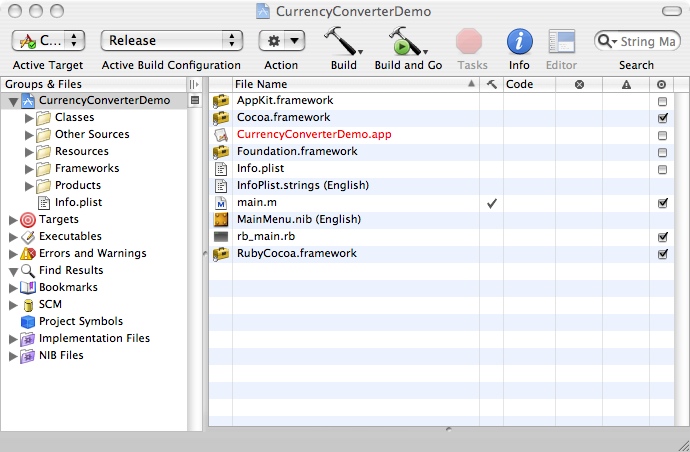
This is your Xcode project, similar to a Visual Studio project for my fellow Windoze converts. The files you’ll be dealing with in this example are:
-
CurrencyConverterDemo.app. You may have named your project differently than I did, but this will be the name of the app file after it’s built. This app is distributable to anybody using Mac OS X just like any other application you might have built in Objective-C. - You may be used to writing Ruby scripts that require the user to install various gems or a particular version of Ruby, but thanks to the RubyCocoa.framework also included in the default project this app can be distributed with your users unaware that what language you wrote it in.
-
MainMenu.nib. You’ll be making this your friend. It’s where you create your interface, your interface objects, and instantiate them as well—assuming they are NSObjects. - You’ll also setup actions, outlets, and bindings. I realize none of this makes sense yet, but bear with me. Double click the Nib file and you’ll open Interface Builder, where most of the action is.
Interface Builder and .nib files took a little getting used to for me, perhaps because of my time doing Windows development, because it’s similar to Windows Forms and Resource files while at the same time being completely different.
When a Cocoa application is loaded the first thing it does is load the Nib file, and instantiate all the objects and variables you’ve setup. That’s right, instantiated objects in a GUI.
There’s a lot more to this than just setting up how the application looks, you’re setting up objects and how they relate to each other too. If you’ve double clicked the Nib file then you should see four windows. The first we’ll be dealing with is the Main Menu.
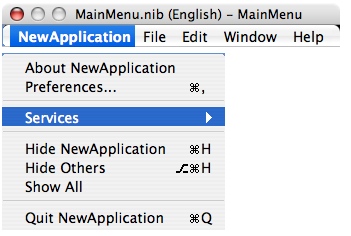
Okay it’s not the best screenshot in the world. The first thing to do is change the name to Currency Converter. Just double-click the name and it will open an editor for you, and you can do that.
Single click the Menu title and you’ll see the drop-down menu. Edit that so that each name is also Currency Converter. Next we’ll setup the window. That’s this empty slate:
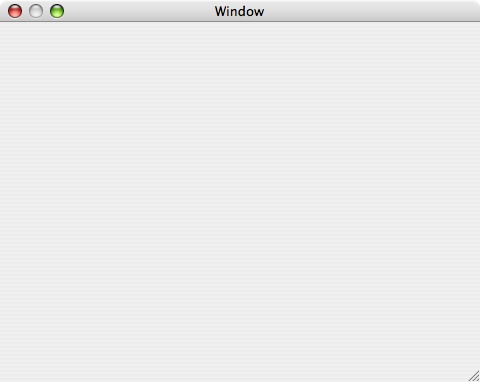
First things first, you don’t want to let our little app be called Window do you? You can’t double-click here, but you can use the Inspector. The Inspector shows you all the properties for whatever object you have selected in the application.
This comes in real handy when you don’t know a keyboard shortcut. Hit Command-Shift-I to bring up the Inspector. That gives you this screen:
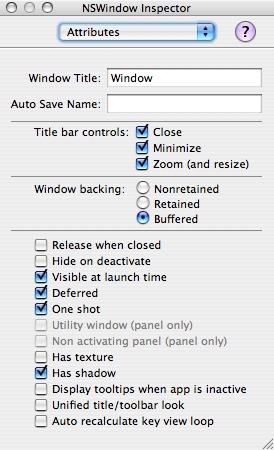
See that field that says Window Title—change it to Currency Converter as well. Let’s change the size too. In the Inspector click the drop-down window that says Attributes and select Size.
In the Content Rectangle section there is a drop down box that says width/height and next to it two windows with width and height. Set the size to 400 x 200. That’s a pretty good starting point.
We’ve got a blank window, think we could use some controls? See that big window on the right—the one that looks like this:
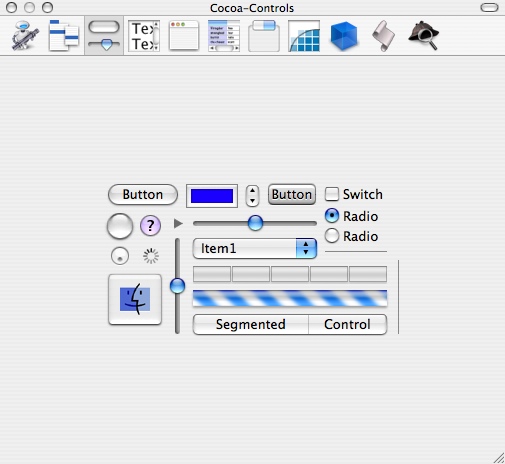
Yipee Toys! The screenshot above shows the Controls view, which isn’t actually what we want because we won’t be adding any buttons yet. We’re adding some text views. Along the top of the window are choices for the different types of Cocoa objects we can add to our application.
Select this one:

So we can start adding text objects to our window. First we will add three edit boxes. Simply take one of the empty edit boxes and drag it to your window.
When you drag your Window over you’ll see blue lines appear. If you lock to those you can take a big step in meeting Apples User Interface guidelines.
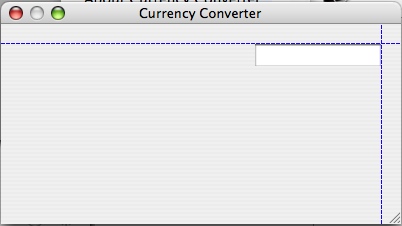
You’ve added the first, but to make life easier on yourself hit Apple-D to make the other two. Make sure you align then on the right blue line, and you should also see a blue line on the top of each box, which marks equal spacing between each edit box.
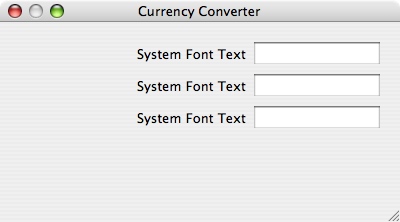
Next add the System Font Text to the left of each box. Add the first one to align with the top box, then again use Apple-D to duplicate them. Align them with each of the boxes, using the blue lines. It should look like this:
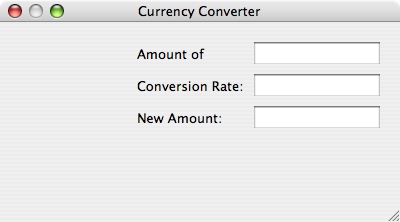
We aren’t exactly finished with our application yet are we? For starters we need to change that to useful text. Double click each text box and change the text to read Amount of Money:, Conversion Rate:, New Amount: respectively. Um—uh oh. This doesn’t look right does it?
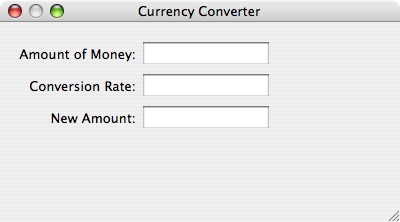
We’re gonna have to fix that. Holding down the shift button click each box. This should select them all. Next choose Layout from the top menu, and choose Size To Fit. This will make all the boxes size to fit the text, and extend the top box to include the text you entered earlier.
If any of your boxes are two lines long it’s because you added a return to the text when you edited it the first time. Go ahead and re-edit the text, deleting the return then size to fit the box again.
Now select each text element individually, and head to the Inspector. It should already be open from previous uses but if not use Apple-Shift-I to open it up. Select the attributes for the text object in the drop-down and set the alignment to the right.

Once again select all the text boxes again making sure you start from Amount of Money:. Choose Layout-> Same Size. Then choose Layout->Alignment->Right edges. Drag all those boxes to the left side of the window, aligning with the blue line when it appears.
I use the keyboard for this so that I don’t accidentally move the text up or down. Finally drag the edit boxes over to the text, again aligning with the blue line. You do this by selecting all of them, then moving them to the left. At this point the box should look like this:
Looks like it’s a little big, but we don’t want to resize it until we add our button. In the Cocoa window go back to the controls view with this button:

Not surprisingly we’re going to add a button to the window, in order to actually convert the currency. Take the button and drag it over to the Window, putting it underneath the boxes and once again aligning with a blue line that will appear above it.
Double click the button and rename it to Convert. Now let’s take a peek at one of the cool parts of Interface Builder. With the button selected, hold the option key and move your mouse over the box. You should see this:
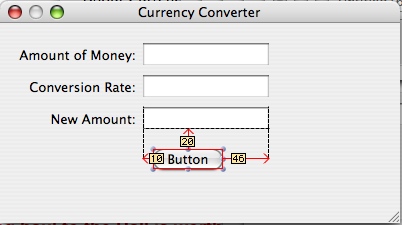
Now by moving the keyboard left and right we can actually put the button directly in the middle of the three boxes. Now it’s time to shrink the screen to fit, just like you would shrink any window until the ever-so-ubiquitous blues appear. Do that now.
Finally just for a flourish let’s add a little line between the button and the boxes. Drag the horizontal line from the controls on to the window right underneath the boxes, aligning with yet another blue line. Extend it to the blue lines on the left and right to make it full sized.
You should have a dialog box that looks like this:
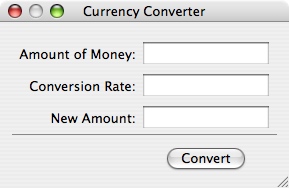
I swear we’re almost to Ruby code, so quit complaining and save your interface. We now need a way to interact with this pretty little picture. The way that’s done in the land of Cocoa is through Actions and Outlets.
Actions are methods that can be triggered by other objects, whereas outlets are pointers to other objects. Essentially if you want to do_ something you need an action if you want to _set or get something you need an outlet.
The first thing to setup is an action—the Convert button needs to _do_ something does it not? In order to connect the action from the button we need to have a class.
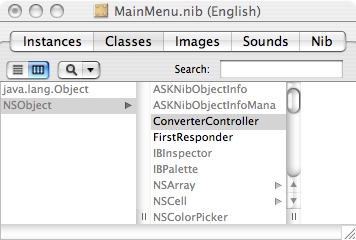
That’s right—we’re going to make some Ruby code. There’s one more window we haven’t yet used in Interface Builder:

Click the Classes tab so we can crate two Ruby classes, both of which will inherit from NSObject. That’s right, Ruby classes inheriting from Objective-C classes.
Like a Picasso it’s disturbing and beautiful at the same time. The Classes view lists all the available Cocoa classes, so scroll to the left side and select NSObject. Then hit enter and it will automatically create a class named ConverterController.
Now this creates a class in the Nib file so that the interface knows about it, but because we’re using Ruby we don’t actually generate our class from it. Let’s also create a class called Converter.
Even though it’s overkill we’re going to create a MVC framework here, simply for demonstration purposes. After you’ve done that select ConverterController and use Apple-Shift-I to again bring up the inspector. You should see this view:
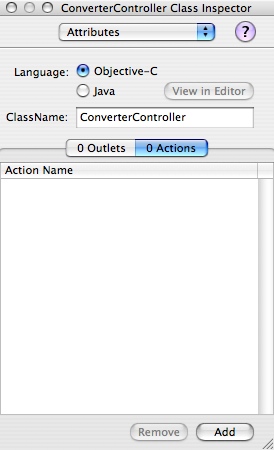
Let’s think for a moment. What is the controller going to need to do. When the button is clicked it needs to get the values for the original amount and conversion rate, calculate the new amount, then set the new amount. This means we will need:
- Action—for the convert button
- Outlet—for getting the original amount
- Outlet—for getting the conversion rate
- Outlet—for setting the new amount
- Outlet—for sending the data to the model to calculate the new amount.
Admit it, you were going to just do the calculation right then and there in the Controller class. Say 10 Hail Matz’s for punishment. Good job. Adding these outlets and actions is pretty self explanatory. Just click add.
There’s one gotcha. The action is a method. Methods in Objective-C will have a colon at the end and you must have the colon at the end in your description of the outlet, even though the method you actually declare will not have one. Otherwise things won’t be found.
When adding outlets there is a drop down for the type. This has a use in Objective-C, but we’re doing Ruby. Leave it at id.
What we’ve created here is a class definition, so that Objective-C can call the classes you haven’t implemented yet. However we also need to instantiate the class, otherwise there’s nothing to connect. Everything you’ve just defined is a variable, it needs to be set to something.
To do that select ConverterController and select from the top-level menu Instantiate ConverterController. Then do the same for Converter. This lets the Cocoa Framework know that when it starts up it needs to create each of these objects.
You won’t be calling new here, in fact you never define initialize or call new on a Ruby Cocoa object. That’s a topic for another day however. In the Instances view you should now see this:
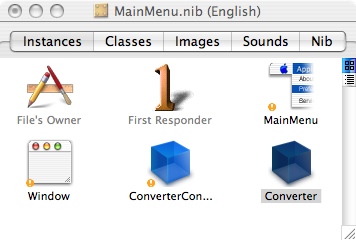
I’m going to re-iterate something. These aren’t a resource file, or an XML definition. What you’ve done here is create real live objects. If you attempt to build and run now it will fail because you haven’t written an underlying implementation, but the objects are there.
They will be allocated. They’re the real thing. Now look at that tiny exclamation point next to ConverterController.
What it says is you have unconnected outlets. When the Cocoa application starts up it’s going to attempt to link those outlets and if you haven’t connected them they will be set to nil. Let’s connect them.
To connect a control to an action you hold the Ctrl key and drag from the button to the class. Think of the connections as following the path of the event, so for example you’ll drag from the Convert button to the class that will implement the action: ConverterController.
When you do that the Inspector will display automatically with the convert: action highlighted. On the bottom of that dialog click connect. It should look something like this:
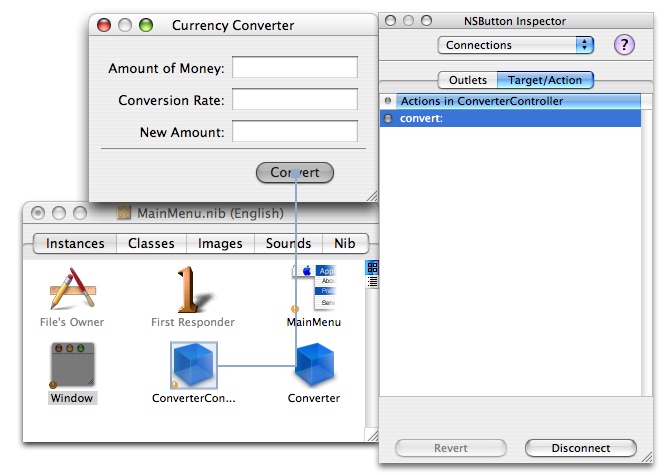
You’ve connected your first action to its target. Now when you click Convert the action convert in the ConverterController class will be called. It’s time to go the other way. Ctrl-drag another line from the ConverterController to the first edit box and connect it to the appropriate outlet. Do the same with the other two edit boxes. You should see this in the Inspector window:
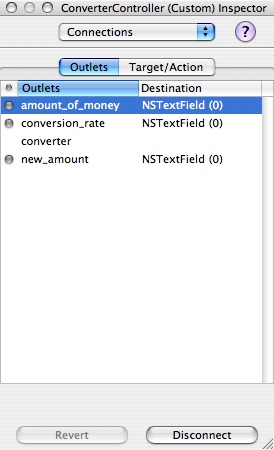
One more to go. You don’t have to go from an instantiated class to an object in the window, you can go from object to object right in the Instances view. Let’s do that now to connect the ConverterController to the Converter object, and you’ve got your final outlet.
Save your Nib file, and go to the Xcode window. On the top window go ahead and click the Build and Go button. The application should start up just fine displaying your new shiny dialog. If you click Convert it does absolutely nothing, say it again.
Yea! We get to write Ruby code to implement those classes now. About time isn’t it? In the action drop down select New File. In the New file dialog make sure you select Ruby NSObject class like so:
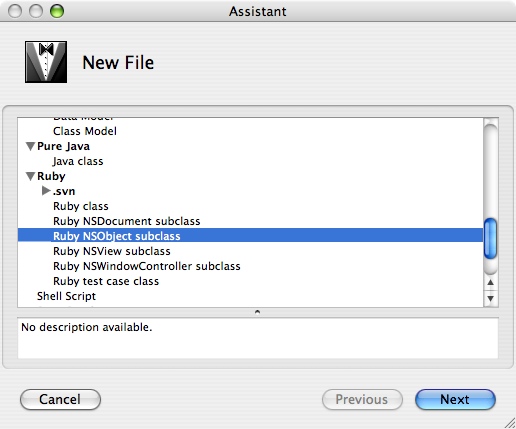
Create converter_controller.rb and converter.rb. Both these will be opened for you in Xcode, but I prefer to open the project at this point in Textmate. Either way your will begin editing your Ruby code. Let’s start with the Converter Controller class.
First things first we’ll delete the boilerplate comments and the require, which is unnecessary. Next we better rename that class to CurrencyConverter and converter to Converter. Don’t blame me, Xcode doesn’t know much about Ruby and has no idea about naming rules. Now we need to implement those outlets and actions and it couldn’t be easier. First the outlets. Where you would normally type attr declarations and the like add this:
ib_outlets :amount_of_money, :conversion_rate, :converter, :new_amount
I know I know, it’s not DRY. I’m sorry but Interface Builder does not support generating this code from the GUI with Ruby, at least not yet. Next the action. Create an empty method named convert. Done!
For some perspective in Objective-C you would have had to define this in the interface, with the proper macro, then implement it in the implementation file.
Sure it’s a few more lines, but you’re a Ruby programmer so you know just how much nicer four lines can be, especially when you keep adding them up over the course of an entire project. Build and run your project again.
It will still do a whole lotta nuthin’, but the console won’t show any errors about being unable to find CurrencyConverter or Converter. If you get errors that classnames must be constant it’s because you forgot to rename the classnames.
You’ve got an implementation ready to be written, and you can add the code. Let’s go into your convert action and get the values from the outlets that will have the user type in. Add this to your class:
def convert
		amount_of_money = @amount_of_money.floatValue
		conversion_rate = @conversion_rate.floatValue
end
I know I’m an idiot right? There’s no initialize method so the outlets are both nil. Okay you got me, so how come when you build and run this the app doesn’t crash? Try it now. Build your new app and add values to those two boxes, then hit convert. Did it crash? It didn’t?
Then I expect an e-mail apology for those nasty thoughts you had about me. The reason it didn’t crash is because of the way Cocoa works. On the start of your application it instantiated the classes necessary and setup all the outlets with the values you specified in the Nib file.
In fact if you were to add an initialize this code wouldn’t work, because RubyCocoa does not even allow initialize in classes that inherit from Cocoa classes. The reason for this is that Cocoa doesn’t have initialize, it has alloc and init.
You can instantiate your own class, and you should for testing, but don’t use initialize.
There’s one other thing funny about the code, and that is the name floatValue. Unfortunately Objective-C methods use camelCase.
I wish RubyCocoa rubified the names, however on the bright side every time you see that naming convention you should be able to instantaneously identify it. Cocoa object here!
Our object still doesn’t convert anything, so let’s finish off the controller’s implementation. Add the calculation and the setting here:
def convert
		amount_of_money = @amount_of_money.floatValue
		conversion_rate = @conversion_rate.floatValue

		new_amount = @converter.convert amount_of_money, conversion_rate

		@new_amount.setFloatValue new_amount
		@amount_of_money.selectText @amount_of_money
end
Reads pretty darn well doesn’t it? Get a float value out of the amount of money and conversion rate boxes, use the converter object to then convert that to a new amount, then set the float value for the new amount.
Finally we select the text to the amount of money dialog box, so that we can calculate again.
I realize I’m explaining method calls very quickly, but I’m not sure there’s that much to say. Compare this to the Objective-C version:
#import "ConverterController.h"

@implementation ConverterController

- (IBAction)convert:(id)sender
{
				float rate, currency, amount;

				currency = [dollarField floatValue];
				rate = [rateField floatValue];
				amount = [converter convertCurrency:currency atRate:rate];

				[amountField setFloatValue:amount];
				[rateField selectText:self];
}

@end
Honestly that’s not even fair to the Ruby version, since I could easily shrink down the calls to get that method into two lines and I didn’t display the header file for ConverterController. Finally let’s write the one-line implementation of the converter model:
def convert(amount, rate)
		return amount * rate
end
We’re done! Look at that, 90% of the work was getting used to interface builder. Build and run your app. Yipee! You can convert currency now. You’re a God. Well at least a demi-god, like Heracles. Here’s hoping this can be a series of articles, and that you keep coming back for more.
Footnotes
This article is largely a conglomeration of other sources and could not have been completed without the following: Aaron Hillegass’s excellent Cocoa Programming for Mac OS X, RubyCocoa.com, the Apple developer website, and of course http://rubycocoa.sourceforge.net.
- http://developer.apple.com/documentation/Cocoa/Conceptual/CocoaFundamentals/WhatIsCocoa/chapter2section2.html# //appleref/doc/uid/TP40002974-CH3-DontLinkElementID_20
- http://developer.apple.com/documentation/Cocoa/Conceptual/ObjCTutorial/
I recommend going through Aaron’s book, using Ruby as your chosen language. You’ll be amazed at how fast you can translate the code.