I went to WWDC last week 1, and while I was there I got a chance to talk to a couple of their engineers and picked up a few things about RubyCocoa.
Running tests in Xcode
When you’re writing RubyCocoa you may find you have three windows open. Xcode to create your files, Interface Builder to design your interface, and Textmate to edit code and run tests. If not Textmate, then probably a command window. To put it politely—this sucks 2.
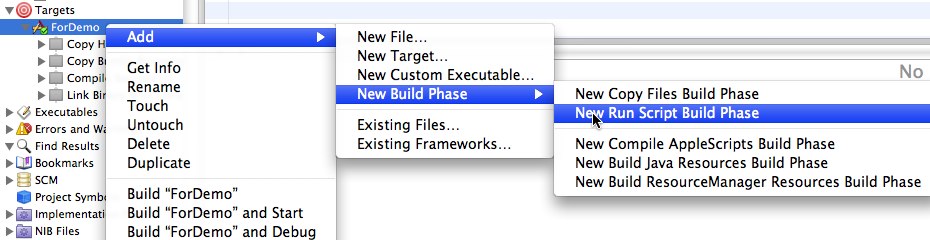
While I’m no big fan of Xcode’s text editor I pretty much have to have it open 3 while I’m developing RubyCocoa, so how do I run specs from within Xcode? It’s simple. Open up or create a new RubyCocoa project. On the left you should see Targets, click the tree to open it:

You can see the process for building your application here. We’re going to add running specs as a last step, so that our build will fail when our specs do. Right click on the target, and add a new Run Script phase:
Then just add this to the script.
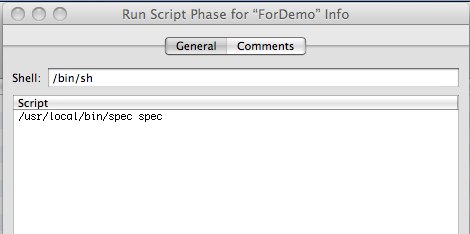
It’s just that simple! I put all my specs in a spec directory, don’t add them to the target of course, and they get run on each build. Here’s an example from a project I’m working on with a failing test:

This shows up in the Build Results window in Xcode which you’ll see when you click the worlds tiniest red x in the corner of the screen.

Congrats, now you can code in Xcode and not Textmate. Okay it’s text editor is poor, but Interface Builder and Xcode are built to work together.
For example when you have Xcode and Interface Builder open you don’t have to constantly drag-and-drop from finder to IB, it just detects your code changes. This is extremely handy when adding actions or outlets.
In fact the two apps are so intertwined Interface Builder just plain doesn’t work that well stand-alone. That’s yet another reason to keep using Xcode, no matter how much I dislike it.
Opening a File or Directory in RubyCocoa
My first two tutorials use simple “selectors,” Objective-C’s fancy name for a method. Actually that’s Smalltalk’s name for a method, and Objective-C steals it.
To use Smalltalk terms there are unary messages, which are the kind that only take one or 0 parameters, and keyword messages. Keyword messages have named parameters, and ruby doesn’t have named parameters, so how do we send multiple arguments to a method in RubyCocoa?
This simple example of opening a directory will demonstrate.
Start by creating a new RubyCocoa project. For directions on the basics go here. We’ll be doing BDD again so I expect you’ll be able to run tests.
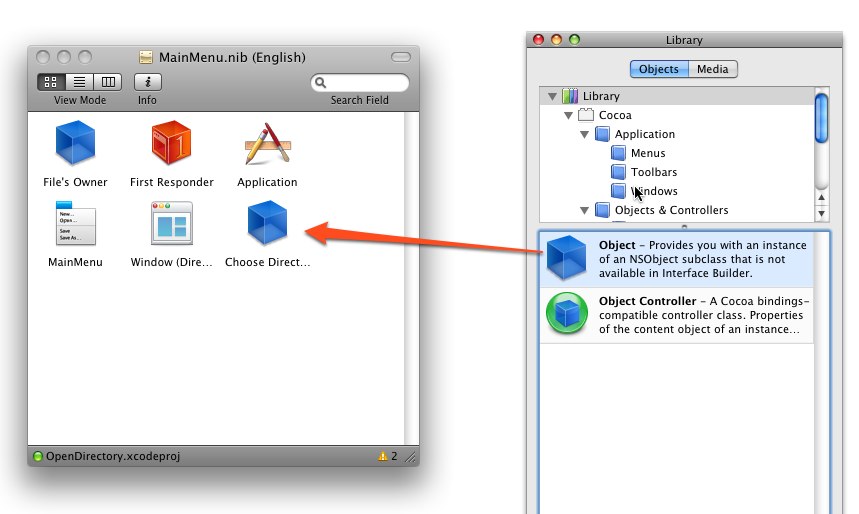
Call your new project OpenDirectory or something similar, then use the directions above to add a run specs phase to your build process. Now open the MainMenu.nib, and create a window that looks like this:
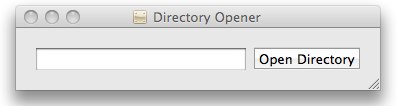
That’s a lovely dialog. Let’s get started running code. Click on the build and go button. What’s this?
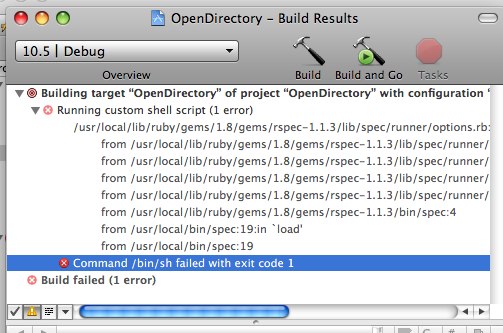
Our build doesn’t work! We don’t have a directory called spec, or any specs in it. Create a spec directory under Create a spec in the spec directory called choose_directory_spec.rb. Remember not to add it to the target, and make sure it is in the specs directory. Here’s our first spec:
require 'choose_directory'

describe ChooseDirectory do
		it "should be an NSObject" do
				directoryController = ChooseDirectory.new
				directoryController.is_a?(OSX::NSObject)
		end
end
I know pretty simple. I’m not going to go baby steps through this because at the moment I lack the patience. If you see an error that your build failed because you don’t have a file choose_directory then you’re on the right track.
Create the ChooseDirectory class, this time in the root directory and add it to the target. I choose to group my specs in an Xcode group called Specs and my classes in the Classes group that’s already provided for you, but those are just groups and you can feel free to do this any way you please.
Now let’s look at the next few tests.
def OSX._ignore_ns_override; true; end

before(:each) do
		@mock_panel = mock(OSX::NSOpenPanel, :canChooseDirectories= => nil, :canChooseFiles= => nil)
		OSX::NSOpenPanel.stub!(:openPanel).and_return(@mock_panel)
		@directoryController = ChooseDirectory.new
end

it "should have an action open directory" do
		@directoryController.open_directory
end

it "should open a panel" do
		OSX::NSOpenPanel.should_receive(:openPanel).and_return(@mock_panel)
		@directoryController.open_directory
end

it "should configure it to select directories" do
		@mock_panel.should_receive(:canChooseDirectories=).with(true)
		@directoryController.open_directory
end

it "should configure it so it can't select files" do
		@mock_panel.should_receive(:canChooseFiles=).with(false)
		@directoryController.open_directory
end
One thing probably jumps out at you, that big strange command def OSX._ignore_ns_override; true; end If you don’t include this you’ll get warnings that you can’t override the methods in OSX::NSOpenPanel because the arguments don’t match.
We didn’t override them of course, we stubbed and mocked them with RSpec, but from Cocoa’s perspective that’s the same thing. We remove the error by monkey-patching _ignore_ns_override to return true.
Rucola 4 apparently has this problem licked, otherwise you’ve got to put this before your mocks get loaded.
Looking down the specs you can see I’m calling NSOpenPanel class methods, and configuring it. The method openPanel creates an NSOpenPanel object and returns it, the other two methods should be self explanatory.
Isn’t it interesting how you can figure out the intent of the code from these tests? It’s almost like a specification. Here’s the code that makes this pass:
lib_action :open_directory
def open_directory
		panel = OSX::NSOpenPanel.openPanel
		panel.canChooseDirectories = true
		panel.canChooseFiles = false
end
One action, open_directory, that sets up the panel. We haven’t displayed the panel yet. Remember what I said about selectors with named parameters? Well here’s where it comes into play.
We need to call the beginSheetForDirectory method on that panel. This will display a standard dialog box for opening directories. Here’s the full method signature, from the Objective-C documentation:
- (void)beginSheetForDirectory:(NSString *)absoluteDirectoryPath
																											file:(NSString *)filename
																										types:(NSArray *)fileTypes
																		modalForWindow:(NSWindow *)docWindow
																			modalDelegate:(id)modalDelegate
																		didEndSelector:(SEL)didEndSelector
																					contextInfo:(void *)contextInfo
This is a keyword message. The syntax works like this:
1[method name]: [first parameter] [first keyword]: [second parameter]…forever So for beginSheetForDirectory that’s one, two, three…oh man that’s a lot of parameters. Here’s what my first attempt at doing this in RubyCocoa looked like (in another application):
beginSheetForDirectory_file_types_modalForWindow_modalDelegate_didEndSelector_contextInfo
	(nil, nil, nil, nil, self, "open_panel_did_end", nil)
Now that is a method name! Fortunately I found a slightly 5 better way to do it. It looks an awful lot like sending a hash of parameters, something that should be familiar to Rails users. Here comes our next test:
it "should call beginSheetForDirectory" do
		@mock_panel.should_receive(:beginSheetForDirectory).with(nil,
																																																												:file, nil,
																																																												:types, nil,
																																																												:modalForWindow, nil,
																																																												:modalDelegate, @controller,
																																																												:didEndSelector, "open_panel_did_end",
																																																												:contextInfo, nil)
		@directoryController.open_directory
end
This is closer to the named parameters convention of Objective-C. The panel will call beginSheetForDirectory with nil as the name of the initial directory.
The first parameter isn’t named, it’s specified by saying “ForDirectory”. By passing nil we say “open this directory to the same directory I did last time.”
Works fine for most situations. Only two of the parameters are really interesting. The first is the modalDelegate, which I’ve specified will be the controller. A message will be sent to the modalDelegate when the panel operation ends. I just want it to send it back to the controller.
The second is the didEndSelector which I’ve specified to be the method open_panel_did_end. We’ll come to that method in a minute.
Let’s make that spec pass:
def open_directory
		panel = OSX::NSOpenPanel.openPanel
		panel.canChooseDirectories = true
		panel.canChooseFiles = false

		panel.beginSheetForDirectory(nil,
																															:file, nil,
																															:types, nil,
																															:modalForWindow, nil,
																															:modalDelegate, @directoryController,
																															:didEndSelector, "open_panel_did_end",
																															:contextInfo, nil)
end
Pretty simple. That command will display an Open Directory screen. What do we want to do with it when we’re done? That’s where open_panel_did_end comes in.
It will be called by Cocoa when the panel is closed. I want to take the directory that was selected by the user, and display it in the text box in our interface.
it "should set the directory name outlet on open_panel_did_end to the directory selected" do
		@directory = mock(OSX::NSTextField)
		@directoryController.directory = @directory
		@mock_panel.stub!(:directory).and_return("Directory")

		@directory.should_receive(:stringValue=).with("Directory")
		@directoryController.open_panel_did_end(@mock_panel, 0, nil)
end
This is a kind of big test. What I’m doing is setting up the controller with the directory outlet, and making sure it gets set with the directory that panel will have set to it when this method is called. You notice that open_panel_did_end takes three parameters.
This is a rule of Cocoa, but I don’t care about the second and third parameters, so we just pass 0 and nil.
Let’s make this guy pass:
def open_panel_did_end(panel, return_code, context=nil)
		@directory.stringValue = panel.directory
end
You can see why I was reluctant to write more than one test. The method is done. Finally let’s build and run our app. It…doesn’t work. Aw heck we haven’t connected our outlets.
We haven’t even created an object. This is where InterfaceBuilder starts to shine. In the library get an Object and drag it over to the Application window.
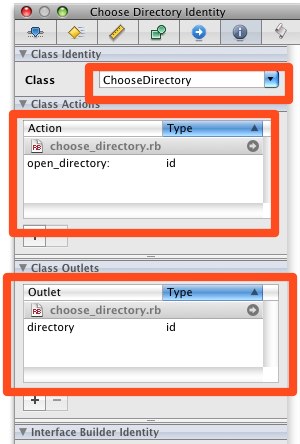
Open its Inspector and go to the information tab. That’s the one with with places for the Class, Actions and Outlets. It has a drop-down menu next to class—use it to select ChooseDirectory.
Notice how we didn’t have to drag-and-drop the file into the app? Look at the Actions and Outlets, they just filled right in!
That’s fantastic. Now we can just draw our connections and build the app. Just do it already and run it. If you’ve done all the steps, and I haven’t messed this up, you should have an application that selects a directory and displays it in a text box.
It’s not very exciting, but you now know two different ways to translate Objective-C’s methods into Ruby methods. Soon you will take over the world!
Footnotes:
- Sometimes it takes a while for me to write a blog post.
- Doug would not find this polite. Jim would claim I’m being too nice.
- Real footnote this time—there is a gem called Rucola that can apparently free you from Xcode. I haven’t had much luck getting it’s dependencies installed and can’t vouch for it.
- There’s that name again. I promise Eloy I’ll get it working one of these days.
-
After beginning this blog post I discovered this method is deprecated. That said I strongly prefer it to the long method name, so I decided to leave it, and will do a little research as to the “why” it’s been deprecated. In the meantime you can use either, or
objc_send. That third way is another blog post.